Creating new pages in the v1 editor
a Sandhills Page vs. a WordPress Page
This one is pretty simple. WordPress pages are basically standard pages that must be edited in the backend of WordPress. They do not have the added secret sauce that allows the editor to add Layout Regions or Widgets. They do work fine, but you will almost always use Sandhills pages.When to use the Back-end WordPress Editor vs. the Front-end Sandhills CMS.
You will use the front-end Sandhills CMS for almost everything . There are only two main functions you do need to use the Back-end for: changing your page templates, and adding pages to the menu. Other than that, there's not much call for the back-end WordPress editor.If you do use the WordPress editor on a page, it will still work. If the page your editing is a Sandhills Page (created from the front end of the site), the content put into the back-end will output between the header and any front-end content. If it was created on the back-end, you won't have the option to add widgets and will only be able to edit the page from the back-end.
Either way, depending on how your template is set up, this content may be added outside of normally formatted areas. So this content may look odd compared to the rest of the site. This is why we don't recommend using the standard back-end WordPress editor for most editing.
Creating a new Sandhills Page
1) Click “+ New > Page ” to Add a New Page.
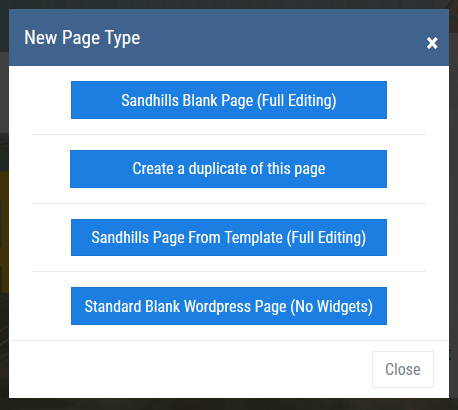
Once you click the button, you should get a pop-up asking you if you want to do a SANDHILLS BLANK PAGE, CREATE A DUPLICATE OF THIS PAGE, SANDHILLS PAGE FROM TEMPLATE or STANDARD WORDPRESS PAGE . You will generally choose Sandhills Blank Page.
-
Sandhills Blank Page (Full Editing)
This is the one you will probably use most for new pages. It creates a blank slate with just the sites header and footer, no widgets or anything.
-
Create a duplicate of this page
This is great for quickly creating a small series of similar pages (like locations, staff bios, etc.) When you create duplicated page, every Layout Area, Widget, word and image is duplicated. It is literally a direct copy of the page with a different page title.
-
Sandhills Page From Template (Full Editing)
These may or may not be set up for you by your Sandhills Designer. This is an easy way for you to have different visual themes with similar looks and repeating graphic elements for different sections of the website. This is similar to the duplicate page option, but you duplicate a predetermined template page that would likely not have page-specific content that would need to be removed. More on these here .
-
Standard Blank WordPress Page (No Widgets)
You probably won't use this much. It is here in case you very specifically do not want to be able to add Widgets to the page. These pages MUST be edited in the back-end using standard WordPress tools.
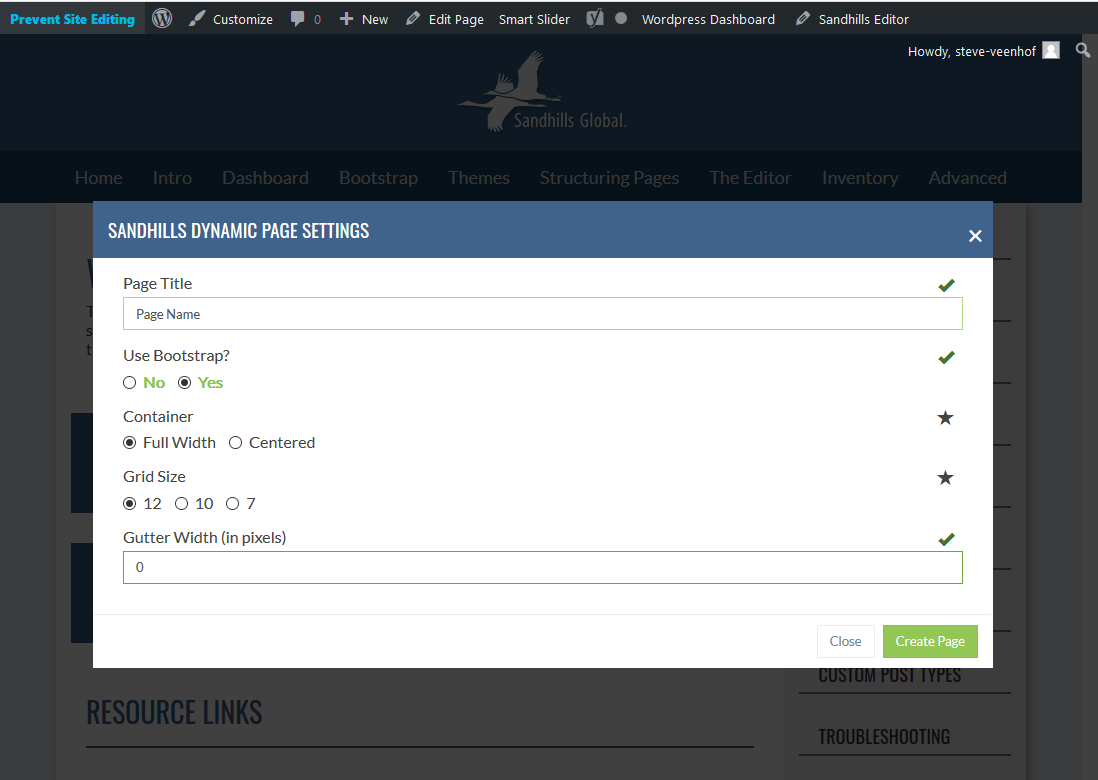
2) Give your page a unique name and choose your Options.
-
Page Title
Type in your page title. Each page must have a UNIQUE title.
-
U
se Bootstrap?
You can choose to use Bootstrap or not. The default is Yes, but your page will work either way. This is mainly for those people who are familiar with Bootstrap and would use it to build content areas in HTML.
-
Container
This is another Bootstrap class. If you want the site to be centered in the background at a maximum width of 1200px, choose Centered. If you want it to go full width no matter how wide the screen, choose Full Width. Either way, at any screen size smaller than 1200px the site will stretch full width.
-
Grid Size
Once again this is based on Bootstrap defaults. A 12 column grid is the most flexible, but if you specifically need 5 or 7 columns, you may change it.
-
e) Gutter Width (in pixels)
This sets the default margin and padding on elements. If you set it to 0, everything will touch seamlessly. If you leave it at 30, everything will have 15px of space on the top, bottom, left and right.
3) Click on the Layout Tab to define your page structure.
4) Add Widgets to the page structure.
5) Add Content.
6) Save and Publish the page
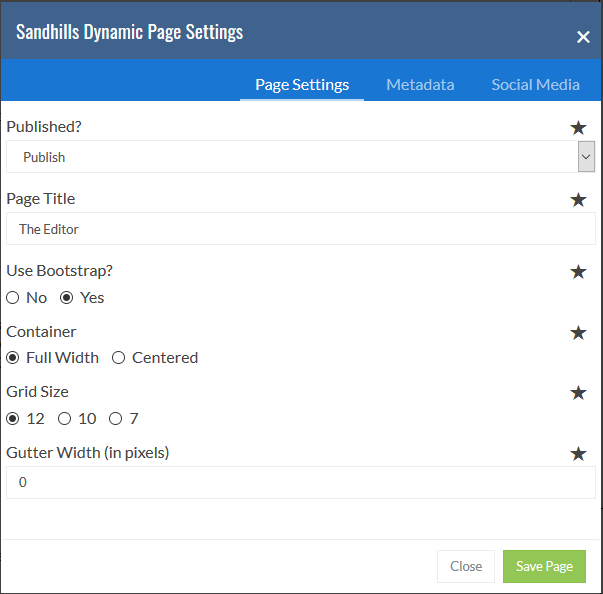
We will get more into the options on the other tabs later in the document. But here’s what you need to know right now.
-
Publish
By default all pages are created in DRAFT mode. These cannot be seen by anyone that isn’t an admin and these pages can’t be added to the menu. Switch this to PUBLISH and it will be visible to everyone and you may now add it to the menu in the next step.
-
Everything Else
The rest of this window is basically another place that has the exact same options as when you created the page in Step 2. This is the easiest way to change those options after the page is created.
-
Metadata
This is the second tab. We won’t go into detail, but if you know what Metadata is, you can add your Description and Keywords for this specific page on this tab.
-
Social Media
The third tab houses metadata fields specific to Twitter and Facebook, including descriptions and default images.
7) Add to menu in back-end.
This is described in the
Menu section
. This step isn’t really necessary right now and can be done once you have all the content on the page. In fact, it can’t be done until you publish the page, so it is recommended that the content be added and approved before you add the page to the menu.
Defining Page Structure in v1
This probably sounds more grandiose than it is. Basically, this is just setting up your page's grid to hold content. Most of the time, you will likely use the default structure and just start adding widgets and content. However, it's nice to know that the system is flexible and that you can easily achieve complex layouts if you choose to.
The Wonderful World of Widgets.
Widgets allow you to make responsive layouts quickly and easily. Widgets are dynamic and can display almost anything you can dream up. There are widgets that allow you to add and edit content & photos, display slideshows & galleries, or create customized contact forms. They can be used to hold any dynamic information on a website.Why widgets?
Dynamic layouts and mobile responsiveness.Layout Areas and Widgets allow us to do a lot of things. By splitting up our content into defined regions, we can easily group and style these unique areas separately from others. We can also create a hierarchy that the website can use to dynamically display data based on screen size.
Both Layout Areas and Widgets are unique to every page. This allows us flexibility to customize them individually over multiple pages. We can re-use standard CSS classes to style widgets similarly or create unique looks for every page. The choice is yours. With the ability to add background images and colors to both the content areas themselves and the container they sit in, you can easily create lots of looks easily without writing a single CSS rule.
Because we use Layout Areas and Widgets to segregate the content into unique areas, the website automatically knows how to rearrange and style the pages for mobile without any extra code. We use Bootstrap (getbootstrap.com) to handle this logic, but you don’t need to use bootstrap yourself. Just create the widget areas the way you want them and the site will translate everything for mobile.
Layout Areas & Widgets.
Layout Areas create page structure and hold Widgets. Widgets hold the page's content.The reason we need BOTH layout areas and widgets is because a lot of widgets just don’t look good full-width. For example, you may only want your contact form to take up half the width of the screen. The widget itself is specifically designed to expand to the full width of its container.
Layout Areas give you the ability to limit the width of the widget containers and create multiple widget areas next to each other on a single line. You can also use these layout areas to add contact forms, photo galleries, etc. that look like sidebars rather than the main focus of attention. It just ads a lot of flexibility to these tools that otherwise would not have a lot of visual control.
Layout Areas
Layout Areas should be the first thing you set up when you create a page. They are the grid that defines the page’s structure.You may add as many Layout Areas as you need to create the necessary grid structure to hold your widgets (content).
These Layout Areas are set up on a 12 column grid system by default and will snap to the closest grid divider as you resize the widths. Height of an area will grow infinitely to hold any content inside of it.
Layout Areas are responsive to screen size, and will reorder themselves relative to each other, not the content inside of them. This means all the content inside a Layout Area will stay grouped together as they stack for mobile devices.
Widgets
Widgets hold and display content. They are added to a Layout Area by clicking the ADD A WIDGET button at the bottom of any Layout Area on a page.Widgets are assigned dynamically to both the page and the Layout Area they are assigned to. You can add as many widgets as you wish to a Layout Area. All widgets expand to the full width of their container. As you add more widgets, they stack vertically. They can be reorganized vertically by clicking the ordering button in the editor and dragging them to the desired position, but they will never sit next to each other in a single Layout Area.
However, the EDITABLE AREA WIDGETS do have the same ability to add and scale multiple content areas as the Layout Area tool. They follow the same 12 column grid and will grow vertically to fit their content. This allows you to create rows and rows of content areas with different sizes, styles, and widths throughout the page in a single Layout Area.
You can add as many widgets to a layout area as you want.
Multiple widgets will all stack nicely on top of each other inside a layout area. Think of each widget as a stripe of content inside it's Layout Area. We recommend that you use the least amount of layout areas possible to achieve your desired design. This keeps your options open as you add or change content on existing pages.Since Editable Area Widgets allow you to create multiple editable regions inside a single widget, you don't necessarily need to subdivide your page with Layout Areas too much to achieve a complex and visually interesting page layout. Try to organize your pages using layers of widget content areas whenever possible.
However, this is more of a general guideline than a rule. The finished page will behave the same whether you use Layout Areas or Editable Area Widgets to organize your information. It really all boils down to personal preference and how you feel comfortable managing your site.
How to use Layout Areas and Widgets
When you first create a page, there is one Layout Area created for you by default. It is full width on the main body of the site. You may use this default Layout Area as it is, or modify it and add additional Layout Areas using the “Layout” button in the editor.The default full-width Layout Area is probably fine for 80% of your pages, but special layouts will often require some modification. You can split up content areas easily in the widget tool, so you don’t need to use Layout Areas to split simple content sections (like text and a single photo or video). However, if you wanted to have an editable area next to another widget like a contact form, or photo gallery, you would need to define Layout Areas to do that.
The reason for this is simple. Widgets cannot hold other widgets. Therefore, you must define a Layout Area to confine the Widgets to a specific width on a page.
For example:
Any contact form will take the full width of its container, so a contact form in a full-width Layout Area will always extend full width. That’s a bit much on desktops, so you may choose to make two Layout Areas on a page and assign the contact form to one and a content area to the other. When the site goes mobile, they will automatically stack and scale appropriately.
Any contact form will take the full width of its container, so a contact form in a full-width Layout Area will always extend full width. That’s a bit much on desktops, so you may choose to make two Layout Areas on a page and assign the contact form to one and a content area to the other. When the site goes mobile, they will automatically stack and scale appropriately.
Please note the ID displayed in every Layout Area. Each Layout Area on every page will have its own unique ID to separate it from others in the database.
Adding Layout Areas
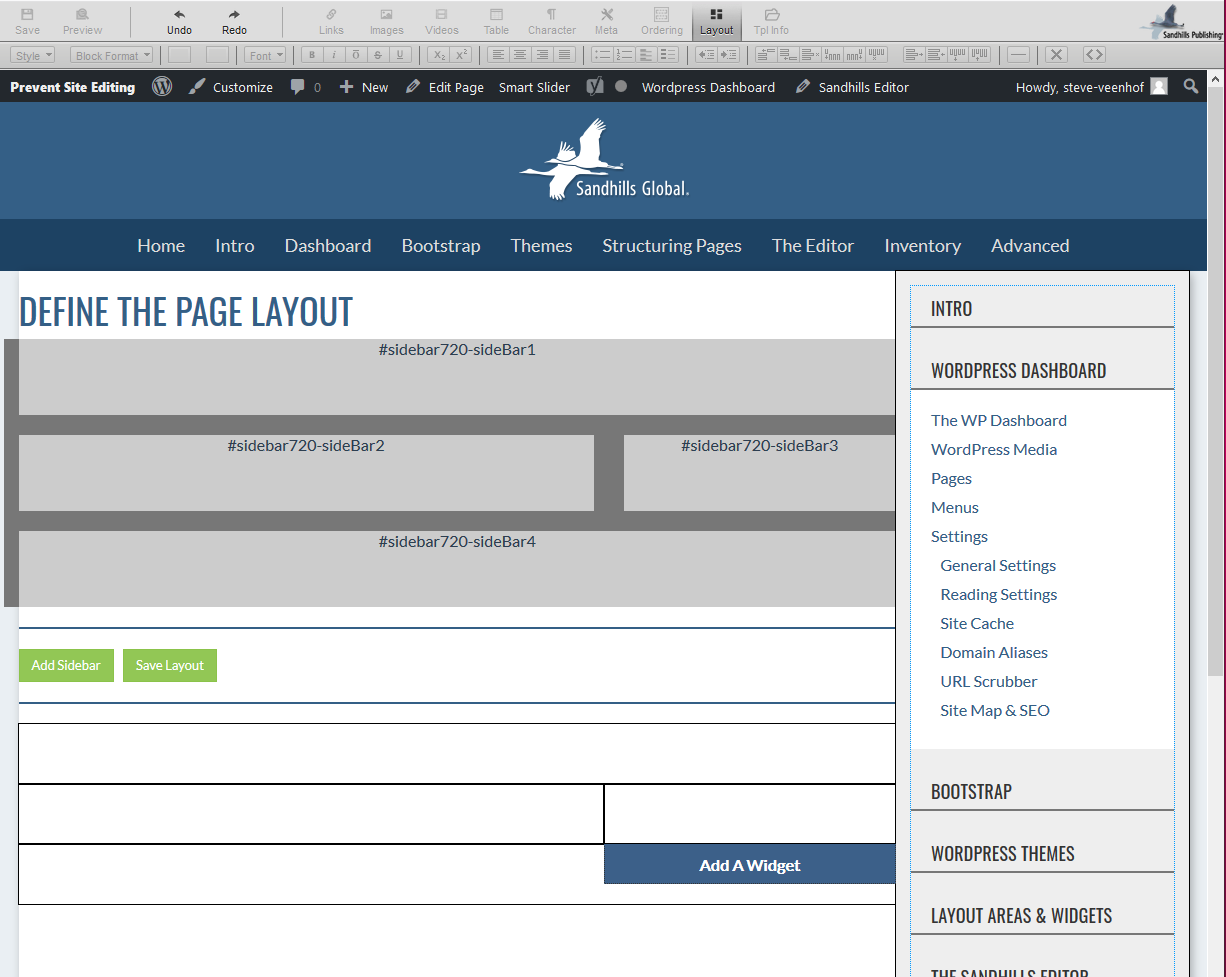
Click the LAYOUT button in the top row of the editor. A medium grey bar will appear above your content on the page with light grey boxes to represent the grid of the Layout Areas on this page. There is only one full-width Layout Area added by default.
You may define as many Layout Areas on a page as you need to create your page structure. You can use them to divide the page both vertically and horizontally.
To extend the example above, you could use that layout to create a page like this:
-
Start with a full width Layout Area that houses a full-width slideshow widget and a full-width editable area widget underneath it.
-
Follow that with 2 layout areas divided roughly 60/40 with a contact form on the left and a smaller Editable Area widget on the right that gives your address, phone number, and hours of operation.
- Last Layout Area on the page is full width again. You can layer more full-width widgets in this area.
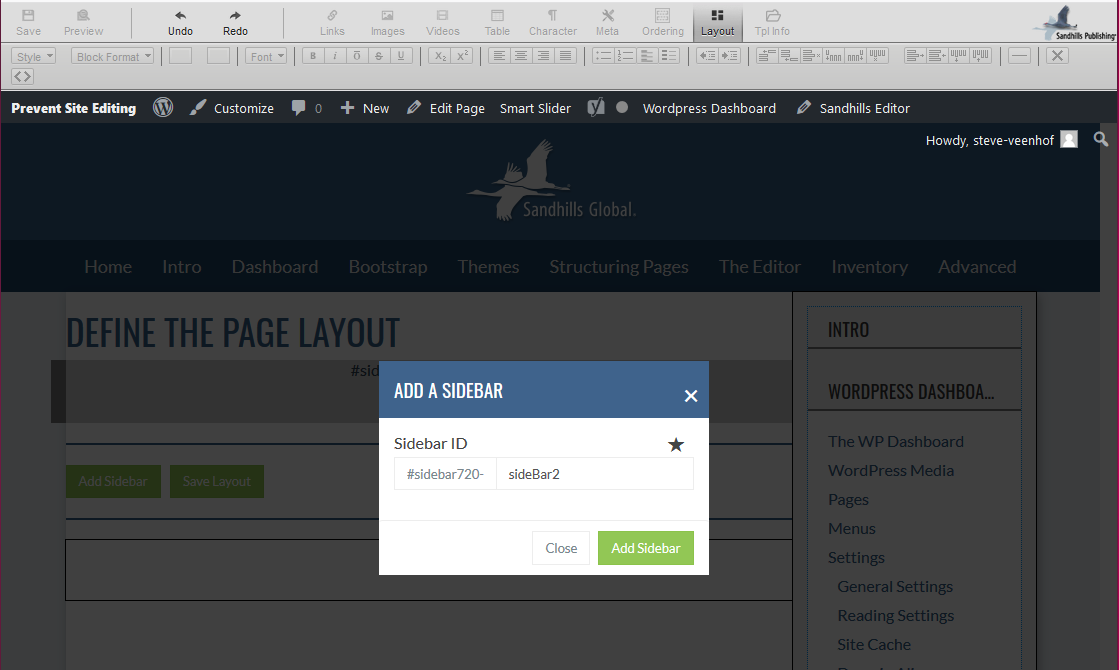
When you click the ADD SIDEBAR button, you will be prompted to give the new div a new id. This id must be a unique name for every Layout Area on the page. Most people just use the default value.
Once you’ve added the Layout Area to the page, it will be only one column wide. You can resize the Layout Area by dragging the lower right corner to the correct size. You may move it anywhere in the 12 column grid by dragging it to that position. The box will snap to the closest edge of the 12 columns.
Layout Areas only expand to the right. If you need to make a right-side Layout Area bigger, resize the Layout Area on the left side to make it smaller, then move the right-side layout area over and expand it to the correct size. Any content inside widgets inside the Layout Areas will re-flow to the new sizes of the Layout Area, but shouldn’t be otherwise affected.
The Editor will also allow blank spaces without Layout Areas if your design calls for that. It's a good way to create an empty margin along the edges of your content area. You don't want text areas to be too wide anyway or they get hard to read.
When you have your Layout Areas set up, click the SAVE LAYOUT button to lock in the layout. When the page refreshes you will see all your new areas and you can start adding widgets to them.
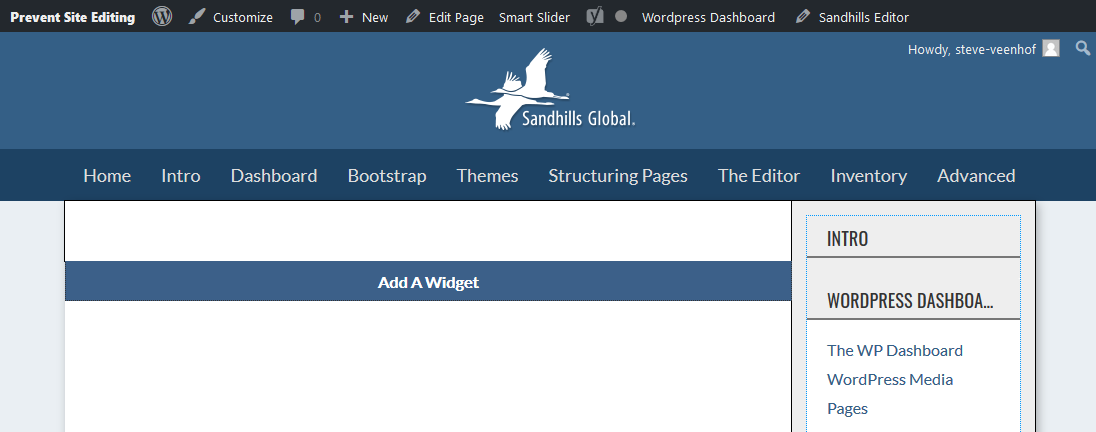
Adding Widgets is super simple as well. Make sure you are in edit mode by clicking the “ Sandhills Editor ” Icon at the top of the page. You should see faint borders around the available Layout Area sections that you can add Widgets to.
Now hover your mouse over the Layout Area you would like to add a content Widget to. You should see an “Add a Widget” button show up at the bottom of the Layout Area in a second or so.
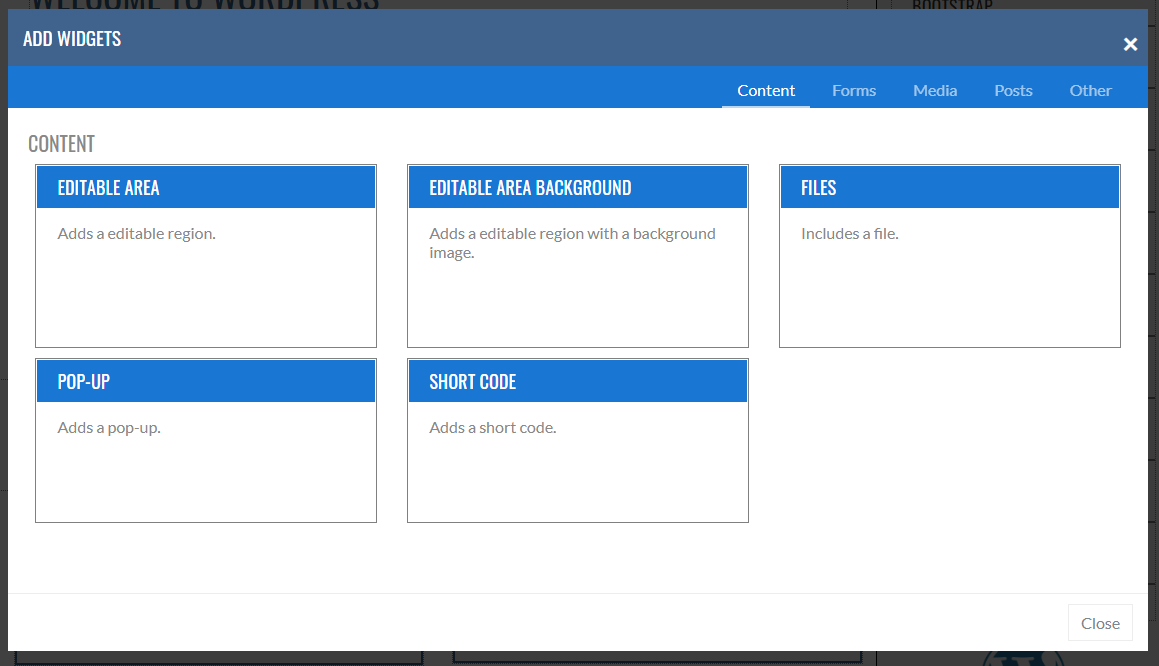
When you click the “ ADD A WIDGET ” button, you will get a pop-up that is divided into tabs that house different groups of widgets.
When you click the “Add a Widget” button, you will get a pop-up that is divided into tabs that house different groups of widgets. We are constantly developing widgets, so don’t be surprised when new ones pop up. The basic widget tabs we have right now are Content, Media, Forms, Google, Testimonials, and Other.
When you have your Layout Areas set up, click the SAVE LAYOUT button to lock in the layout. When the page refreshes you will see all your new areas and you can start adding widgets to them.
Adding Widgets
Adding Widgets is super simple as well. Make sure you are in edit mode by clicking the “ Sandhills Editor ” Icon at the top of the page. You should see faint borders around the available Layout Area sections that you can add Widgets to.
Now hover your mouse over the Layout Area you would like to add a content Widget to. You should see an “Add a Widget” button show up at the bottom of the Layout Area in a second or so.
When you click the “ ADD A WIDGET ” button, you will get a pop-up that is divided into tabs that house different groups of widgets.
Available Widgets
When you click the “Add a Widget” button, you will get a pop-up that is divided into tabs that house different groups of widgets. We are constantly developing widgets, so don’t be surprised when new ones pop up. The basic widget tabs we have right now are Content, Media, Forms, Google, Testimonials, and Other.
Editing and Deleting Widgets in v1
Editing and deleting widgets is as easy as adding them. When you hover your mouse over a widget, the Edit Widget & Delete Widget buttons appear below that widget on the left. They will hover over any content below this widget, overlapping it. They will hover there for a few seconds and then go away.

If the widget is the last widget in a content area, the Edit & Delete buttons will end up hovering over the Add A Widget button, making it unclickable. Wait just a few seconds for them to disappear and then you can click the Add A Widget button.

Some widgets that are very simple will also not be editable, such as testimonials, search boxes, Short Codes, etc. These usually only have 1 setting and it’s easier to just delete them and re-add them with the new settings.
The Edit Widget button will open up the widget settings dialog box so you can change any setting described above (such as background images, widget sizes, etc.). It’s just like adding a new widget, but all your existing settings should be preloaded in the widget when you open it.
The Delete Widget button will delete the widget permanently. There’s no getting it back. But don’t worry, we do make you verify you want to delete the widget before it is deleted permanently.
Classing your Pages, Layout Areas & Widgets in v1
When adding Layout Areas and Widgets, your Sandhills designer may have set up some pre-formatted classes to style these elements for you. These are very easy to implement. Just choose the correct style from the drop-down menu.
Adding a class to an element
This may be a little confusing at first glance, but it makes complete sense once you've used it once or twice.Classes are always added to elements via the CSS CLASS(ES) multi-select menu .
Just select any or all classes you would like to add to the element. You will see the the comma separated list being built above the menu.
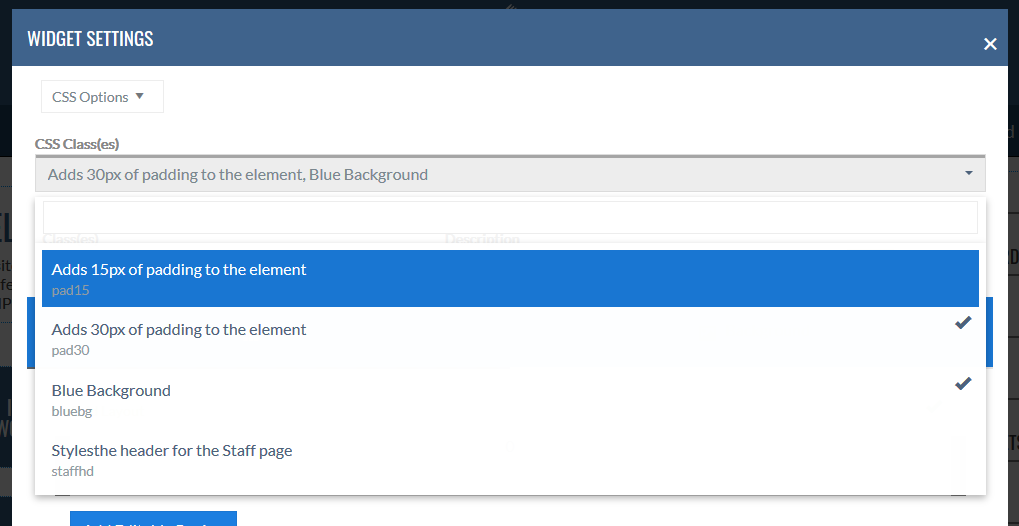
NOTE:
All classes are stored individually for each type of element. For example, the list of classes for Editable Areas is different and independent of the list of classes for Editable Area Backgrounds because they are different types of widgets. This helps manage the length of the lists and also helps you choose the right classes.Creating Content Pages from Templates
Page Content Templates are an easy way for you to have different visual themes for different sections of the website without setting up actual WordPress templates. This is similar to the duplicate page, but you duplicate a predetermined template page that would likely not have page-specific content that would need to be removed.
When you create a page from a template, all structure and content is duplicated from this template page. These are designed for situations where you will likely be creating a series of pages and you need to have certain things already set up for them (like title graphics, classed editable areas, contact forms, etc.)
Once a page is created from a template, it creates an exact stand-alone duplicate of the template page selected down to the letter, but with a new page title. Once the page is created, it is it's own entity. Updating the template itself will not update any existing pages.
Once a page is created from a template, it creates an exact stand-alone duplicate of the template page selected down to the letter, but with a new page title. Once the page is created, it is it's own entity. Updating the template itself will not update any existing pages.
Please Note: Your Sandhills Designer will have created these templates for you already if your site uses them.
Creating a new page from a template
-
Select
NEW > PAGE
from the top menu as normal.
-
Click the
Sandhills Page From Template (Full Editing)
button from the modal window.
-
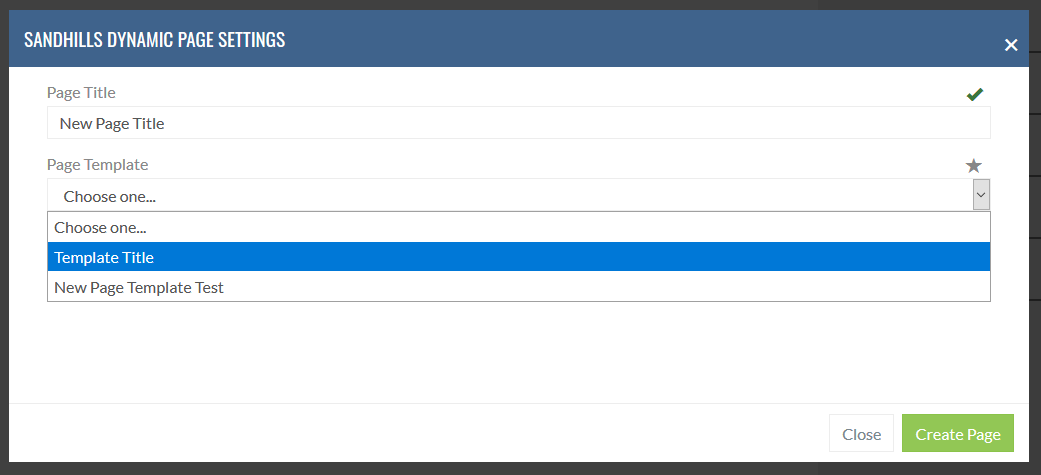
The New Page Template screen will pop up. Give your new page a Title and choose the correct template from the drop-down menu.
-
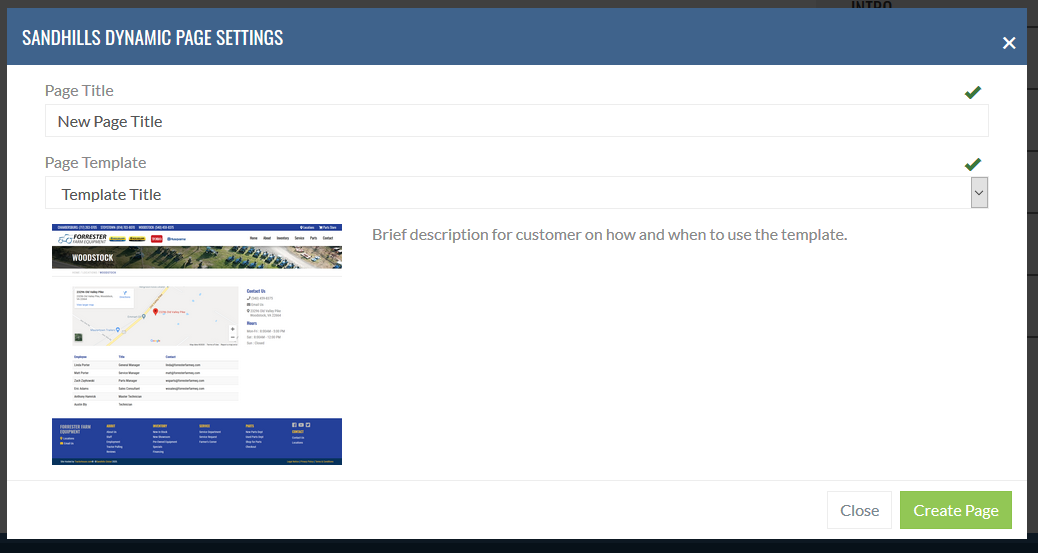
Once you choose a template, the thumbnail and description will populate so you know you selected the correct one from the list.
-
Click
Create Page
and you are ready to start entering content! Most templates will already have your widgets in place.