The WordPress v1 Dashboard
(Not many differences from the latest editor)The back end of WordPress can be intimidating, but its not that bad once you know where to find things. Since we do the vast majority of our editing on the front of the site, there really are only a few things you need to be aware of in the back end. Here's a basic list.
Welcome to the Dashboard
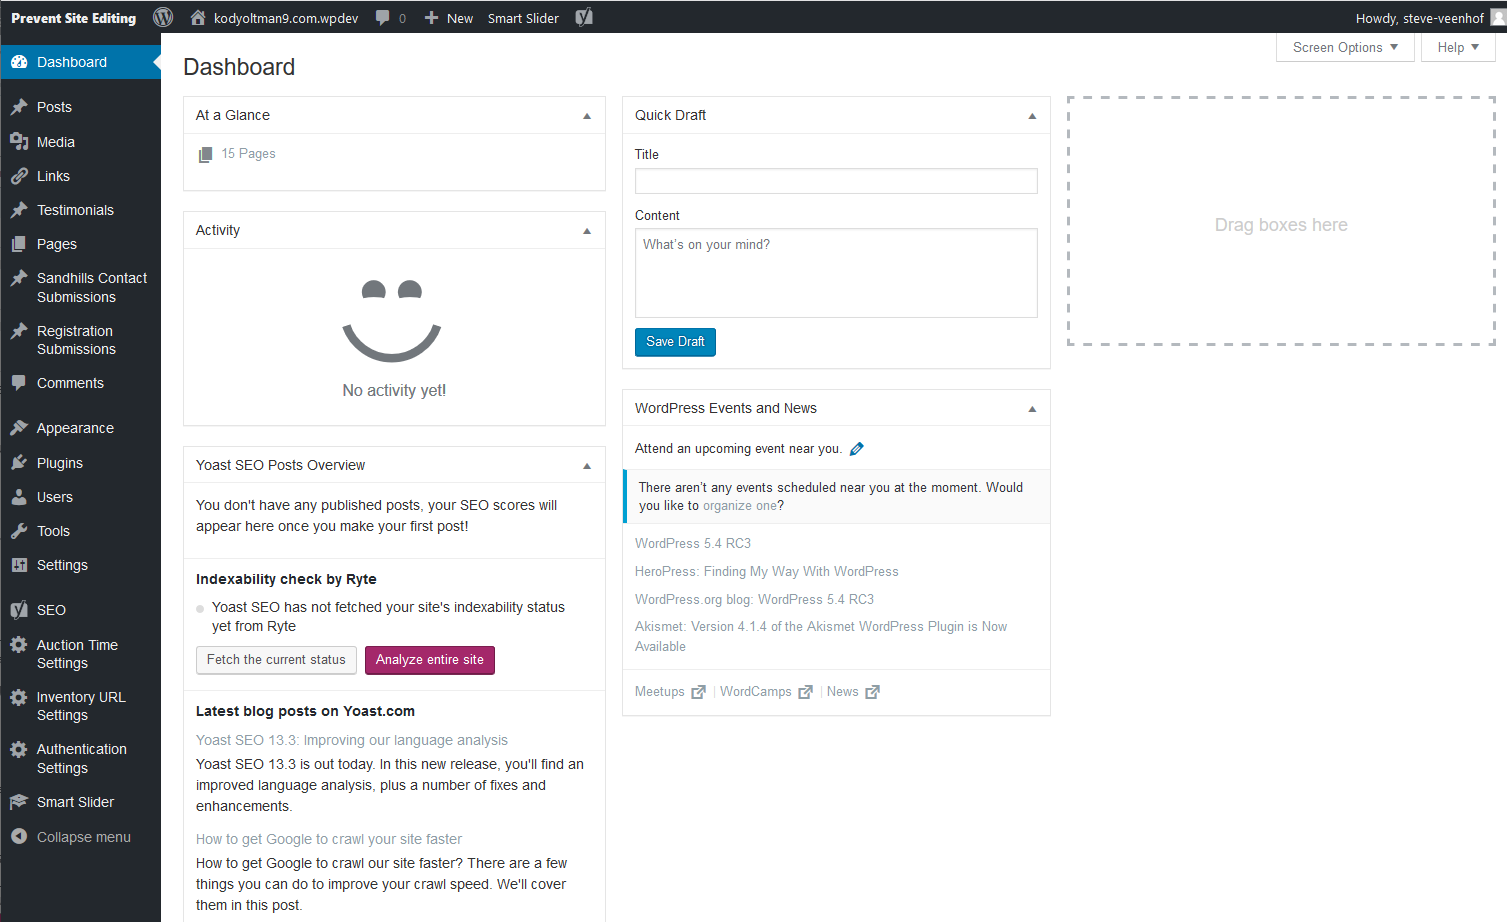
There's almost nothing you need to worry about on this screen. It's mostly just general information, and isn't very useful. The main thing you need to be aware of here is just the black admin menu down the left side .
Here are the sections you'll use most:
WORDPRESS MEDIA admin
Both the Sandhills CMS and the WordPress editor use the standard media functions built into WordPress. As such it really doesn’t matter where you add your media files. If you like the standard WordPress Editor, use the backend tools. If you’re editing a page and need to add a photo, use the Sandhills CMS. Either way they end up in the same big pot of photos.
WORDPRESS MEDIA LIBRARY
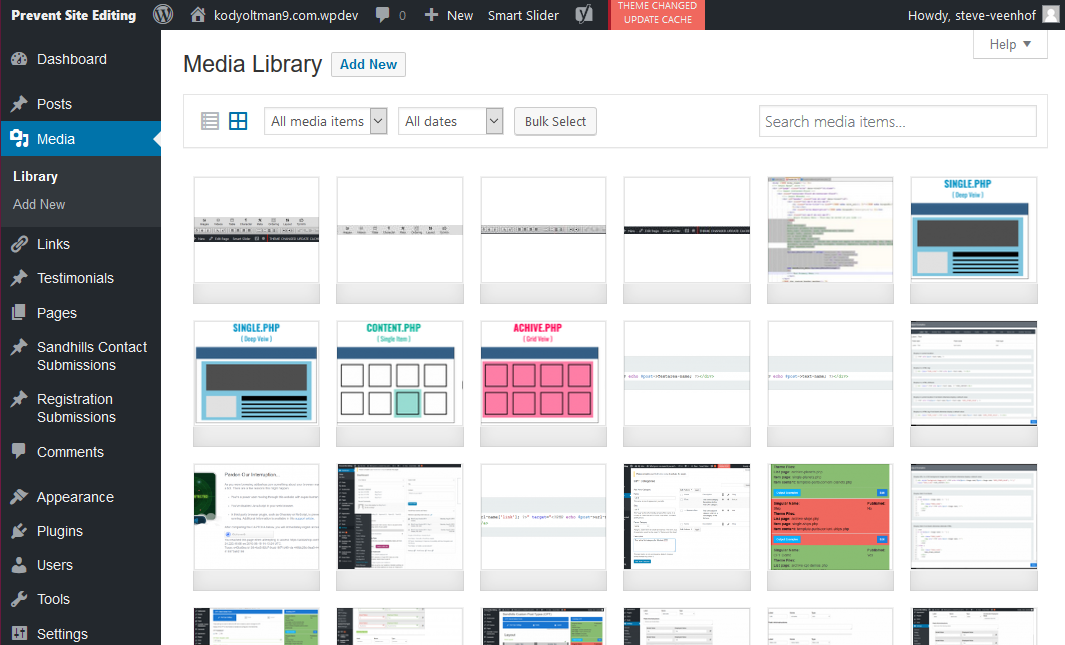
All media file are stored in the MEDIA > LIBRARY tab in the back of the site. From here you can add new files or manage existing ones. The files are displayed from newest to oldest by upload date, so the photo you just uploaded should always be in the upper left corner of the table.
To add a photo, simply click the
ADD NEW
button at the top of the page. You will get a large box with a dashed line around it. Just drag the files you want on the website into this box and release the mouse button. The system will automatically upload them and give you a progress bar underneath the box to show how each file is progressing. You may also click the SELECT FILES button to simply browse and upload the photo(s).
All media files (Photos, PDFs, and .mp4 movies) are displayed in a grid in the main pane of the Media page. Each image does have it's own settings pane as well. Just double click the image and the Attachment Details window will pop up. This is where a lot of the magic happens.
Managing Photo Settings in the WordPress Attachment Details Pane
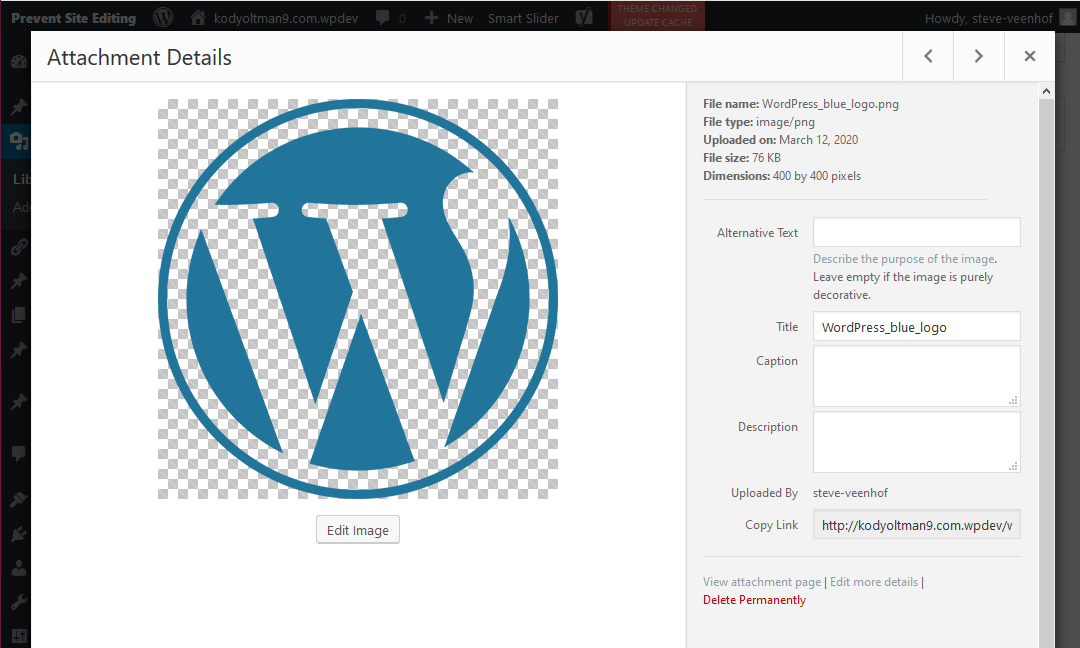
Edit Image Button
WordPress has some really nice photo functions built in. If you click the EDIT IMAGE button, you can actually scale the image down to fit your container and WordPress will re-save your file to be a lower image size and still leave the original intact. In fact, one of the quirks of WordPress is that it treats images like they are posts. That means they can be used anywhere on the site, but they can also be their own stand-alone page.
WordPress has some really nice photo functions built in. If you click the EDIT IMAGE button, you can actually scale the image down to fit your container and WordPress will re-save your file to be a lower image size and still leave the original intact. In fact, one of the quirks of WordPress is that it treats images like they are posts. That means they can be used anywhere on the site, but they can also be their own stand-alone page.
Image Details
There is some good info at the top of the right pane. The most useful pieces are probably the FILE SIZE and the DIMENTIONS. WordPress never overwrites an image, so sometimes you may have several images that look the same in the folder. This will help you determine the size and date uploaded to make sure you are selecting the right image.
Alternative Text, Title Caption, & Description
Most of these values are valuable for SEO. When any value is set back here, every time you place the image with the CMS editor it will prepopulate with this setting.
Copy Link
This is the easiest place to find the URL for your image to manually insert it anywhere in the files or on the site.
We recommend only copying the relative path, not the full absolute path. ( Only use the part from "/wp-content/..." back instead of using the absolute path with the URL added " /wp-content/uploads/2020/03/WordPress_blue_logo.png ." This will help make sure your links don't have issues as we change domains between environments. Dev, Stg, & Live all have their own domains, so the links change as we copy the site. Relative URLs will just work in any environment.
Edit More Details
Most of these values are valuable for SEO. When any value is set back here, every time you place the image with the CMS editor it will prepopulate with this setting.
Copy Link
This is the easiest place to find the URL for your image to manually insert it anywhere in the files or on the site.
We recommend only copying the relative path, not the full absolute path. ( Only use the part from "/wp-content/..." back instead of using the absolute path with the URL added " /wp-content/uploads/2020/03/WordPress_blue_logo.png ." This will help make sure your links don't have issues as we change domains between environments. Dev, Stg, & Live all have their own domains, so the links change as we copy the site. Relative URLs will just work in any environment.
There really aren't many more details, but it's a larger interface to edit the settings above.
Delete Permanently
This is how you remove an image from the Media Gallery. Just click the button and confirm you want to delete it.
Pages
You generally DO NOT want to add new pages from the dashboard. Let me repeat, you generally DO NOT want to add new pages from the dashboard. Pages created from the backend dashboard will not have the code required to use our front-end editor, which generally has more features and is much easier to use.
If you do need a page that will not have the editor, you can still create the pages back here and they will work. You just won't be able to add widgets to them on the front end.
Click here to see how to add pages via the front end
The WordPress Editor
There are two looks based on which WordPress editor you have active. There are fairly big differences between the editors themselves, but everything else is the same.Old Look (classic)

New Look (called gutenburg)
Which ever editor is showing in your site, the controls you will be editing are the same thing.
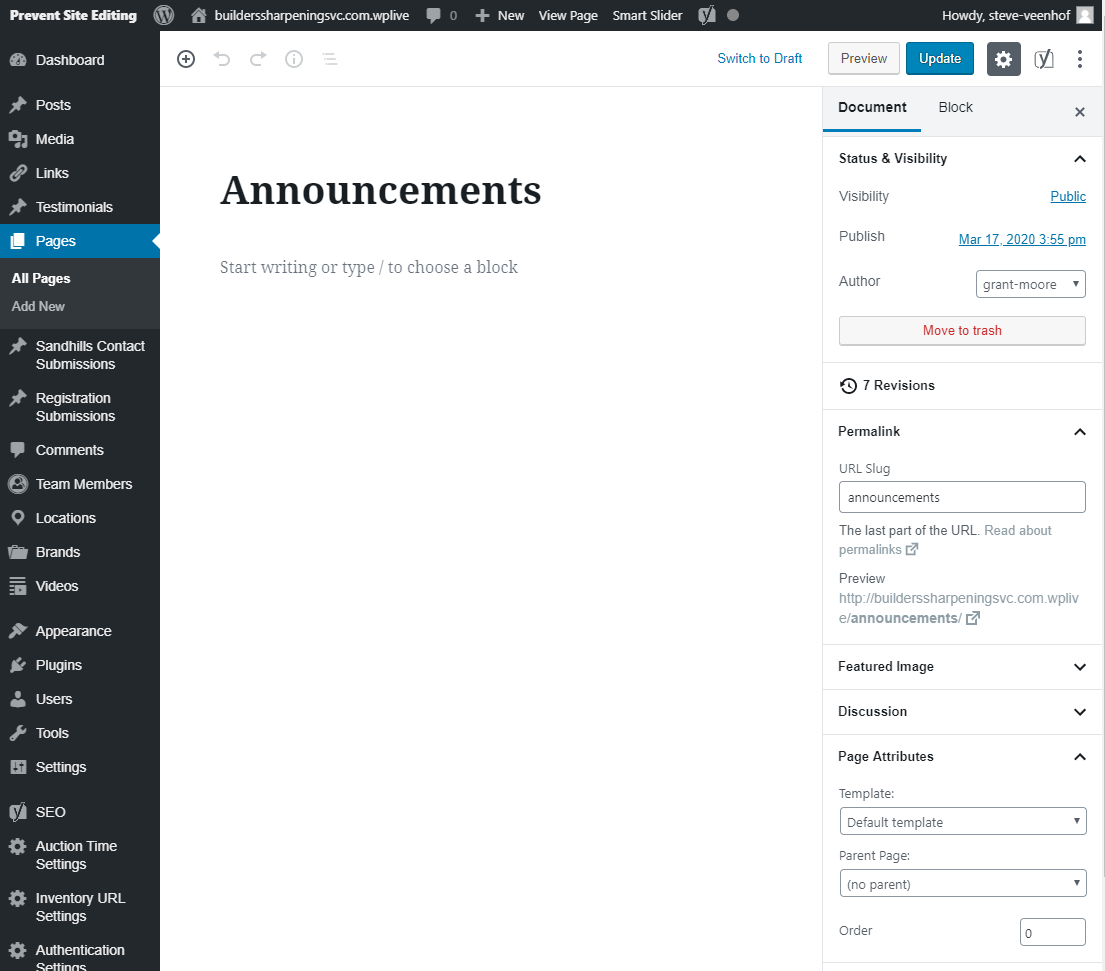
Page Title
This is what your page is called in the back end. This needs to be unique. The first time you save the page, it will become the Permalink and the Slug. Both can be edited later, so don't worry about that now.Permalink
Permalinks are the permanent URLs to your individual pages. Permalinks allow us to have unique URLs that never change, even if the content on them changes dramatically. This is useful in dynamic sites because it prevents links from breaking just because you changed a page title. By default, we make the Permalinks the same as the page title, but they can follow different rules depending on your settings.Once set, the permalinks will remain the same, even if you change the page title or slug later. You can edit the permalink manually, but it will never update on its own — hence the term permalink.
Slug
Slugs are the short, easy to remember, SEO friendly names of your posts, pages, categories, and tags. Even images have slugs, so It can get confused.A slug will be different when the title contains certain characters, like spaces or currency symbols, as well as anything else that isn’t a letter or a number. In those cases, the special character is either replaced with its URL-friendly equivalent or left out of the slug entirely. The most common substitution is in titles that have more than one word, separated by spaces. In that case, each space is replaced by a hyphen ( – ).
NOTE:
Images are considered a type of posts and also have slugs. Be careful that your images don't share a name with a page in WordPress, or it will render the first slug retrieved from the database when the slug URL is called. If you can't get pages to resolve, make sure the slug for an image (or some other content) isn't interfering with the page slug.
Here is a link with more info on the new WP editor (Code named Gutenberg):
https://wordpress.org/support/article/wordpress-editor/
The PREVIEW button will allow you to see the page from the front, even if not published. This is important for the WordPress editor as the editing does not reflect the live site directly. It is in a different format and not all styles are applied in the back end editor. There's lots of switching back and forth with the WordPress editor.
The WordPress editor
We generally don't use the back end WordPress editor, so we won't go into it here, but if you do want to use it, you certainly can. If you add content to a Sandhills Page with the back-end editor, it will show up right below the header above the widget-based content added through the front end.Here is a link with more info on the new WP editor (Code named Gutenberg):
https://wordpress.org/support/article/wordpress-editor/
Publish
There's lots of good info here. The biggest thing here is that this is where the PUBLISH or UPDATE buttons tend to live. Publish determines whether that page is visible to the public yet or not. An unpublihed page will have the PUBLISH button, a published page will have the UPDATE button.The PREVIEW button will allow you to see the page from the front, even if not published. This is important for the WordPress editor as the editing does not reflect the live site directly. It is in a different format and not all styles are applied in the back end editor. There's lots of switching back and forth with the WordPress editor.
Page Attributes
This is where you will assign page templates. Assigning templates is a crucial part of setting up inventory. We will get into depth with this in that section. For now, just know that all registered templates will populate in the "
Template
" drop down menu. Just select the one you want from the list!
You can also assign pages to categories or group them under other pages from this box.
This little box just opts this particular page in or out of being cached for customers. We recommend turning this on for live sites, but it's not overly useful on DEV or STG where you are generally logged in.
This one is hidden in the
Screen Options
tab. However, you should know it's there because it can save your bacon.
WordPress saves a copy of version of every page that you save. They are stored as revisions in database. You can revert back to an older revision using this tool. It's definitely not 100% reliable, but it's super handy to have available when you need it. Let's hope you never have to use it.
One of the bigger issues with WordPress is that all the images on the site sit in one big pot and are hard to manage. Especially if your site has lots of images.
Media Folders help alleviate this problem by giving folders to organize and group images. Technically, we are using tags on the images to group the images like they were in folders. However, neither you nor your customer are likely to notice a difference.
You can also assign pages to categories or group them under other pages from this box.
Featured Image
Featured images (also sometimes called Post Thumbnails) are images that represent an individual Post, Page, or Custom Post Type. When you create your Theme, you can output the featured image in a number of different ways, on your archive page, in your header, or above a post, for example.Use Cache
This is from the Sandhills Site Cache system. It takes an HTML snapshot of a page and will serve that for any content page in the site. This decreases load times considerably and has much fewer queries on the database. When you are logged in it is disabled for every page.This little box just opts this particular page in or out of being cached for customers. We recommend turning this on for live sites, but it's not overly useful on DEV or STG where you are generally logged in.
Screen Options
This useful little tool is cleverly hidden up in the top right corner of almost all pages on the WordPress Dashboard. WordPress has more Page options than it displays. You can toggle them on or off easily by checking or unchecking the different page sections in the
Screen Options
tab. Play around and see what you like to have visible.
Revisions
WordPress saves a copy of version of every page that you save. They are stored as revisions in database. You can revert back to an older revision using this tool. It's definitely not 100% reliable, but it's super handy to have available when you need it. Let's hope you never have to use it.
Media Folders
One of the bigger issues with WordPress is that all the images on the site sit in one big pot and are hard to manage. Especially if your site has lots of images.
Media Folders help alleviate this problem by giving folders to organize and group images. Technically, we are using tags on the images to group the images like they were in folders. However, neither you nor your customer are likely to notice a difference.
To get to the new view, go to MEDIA > FOLDER VIEW .
If you do not have the folder view option , you may h ave to have a Sandhills Designer activate it. Just contact your Sandhill Sales Rep and they can get it turned it on for you.
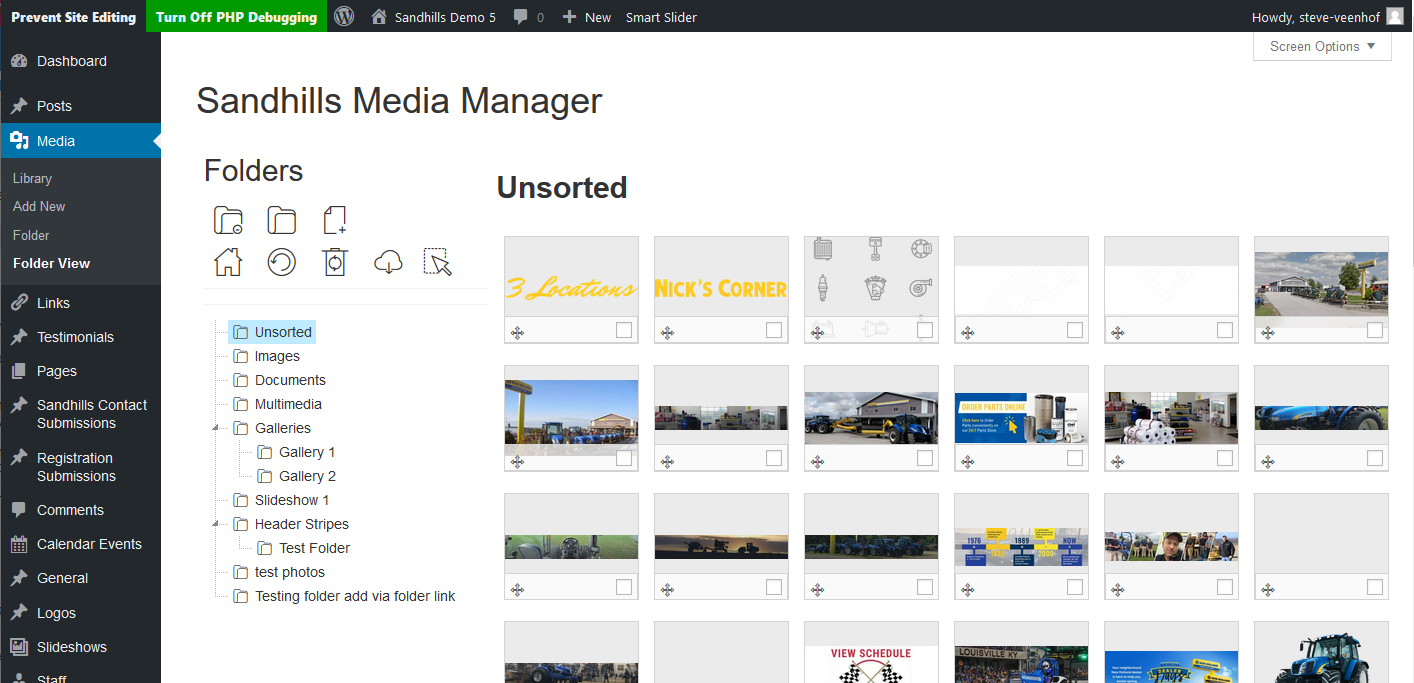
The Tools
The icons aren't the best, but he functionality is pretty straight-forward. If you hover over any of the icons, a tooltip will pop-up to help you figure out what it does.
 |
Remove Folder
Removes the selected folder. You can choose to delete images + folder or just the folder in the popup window that is triggered. |
 |
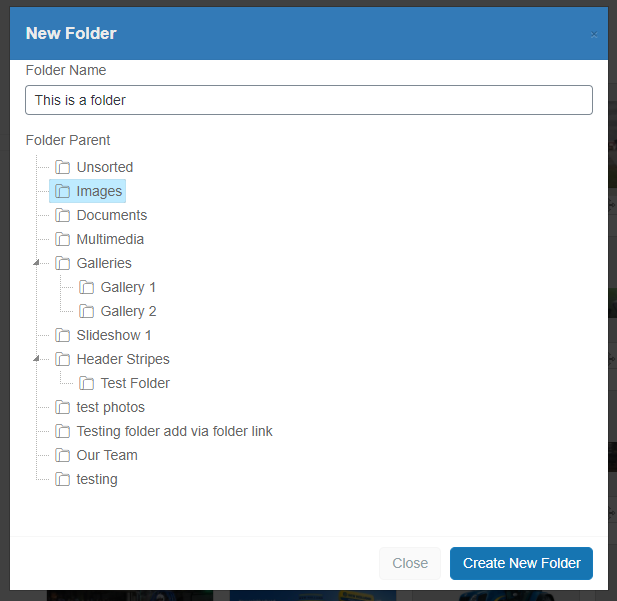
New Folder
Opens the New Folder modal window.Name the new folder and select it's parent item for nested folders. |
 |
Add Media
Pops up a file select window to add media. |
 |
Home
Returns to the home screen with Unsorted folder selected |
 |
Refresh
Refreshes the page. Use this if it seems like recent changes aren't reflected in the current view. |
 |
Delete Selected Media
Deletes all items that are currently checked. |
 |
Download
Allows you to download selected media from folder. |
 |
Toggle Bulk Select
Allows you to drag and highlight multiple images at once. |
 |
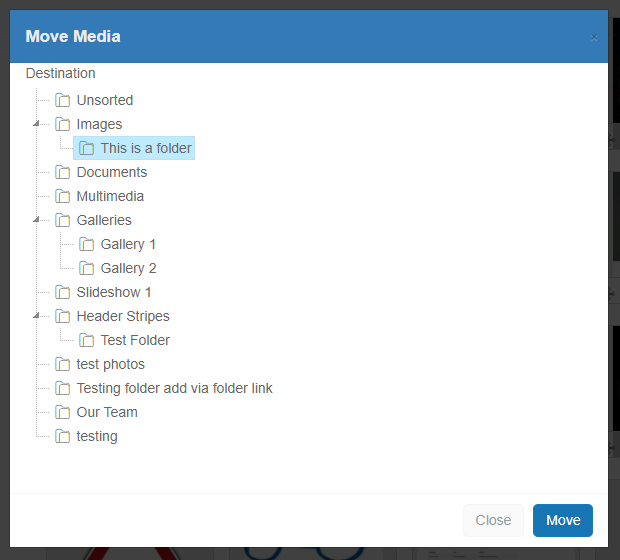
Move
Moves the image(s) from the current folder to one selected from the copy modal window. |
 |
Copy Selected to Folder
Moves a copy of the image(s) from the current folder to one selected from the copy modal window. |
 |
Remove from folder
Removes selected image(s) from folder without deleting the image(s). If the image doesn't exist in any other folders, it moves the image to the unsorted folder. |
 |
Reorder Images in Folder
This is the lower left corner of images. Grab and drag the image to where you want it to be in the folder. |
 |
Selected Image
Lower Right corner of image. Click the checkbox to manage groups of images together. |
Adding a Folder
-
Click the
NEW FOLDER
icon in the toolbar to pop-up the modal window.
-
Give your new folder a name.
-
Choose any parent item you would like it to nest under. There is no limit to the number of nested folders.
- Click CREATE NEW FOLDER.
Moving Images to a Folder
-
Select all images you would like to move.
-
Click the
MOVE SELECTED TO FOLDER
icon in the toolbar to pop-up the modal window.
-
Choose the destination folder.
- Click MOVE.
Menus
Menus are handled by default WordPress functions. This was done for several reasons, but the main one is that future WordPress updates won’t impact menu functionality. So, you will manage adding and publishing those pages in the backend of WordPress, even though the pages themselves are created on the front end.
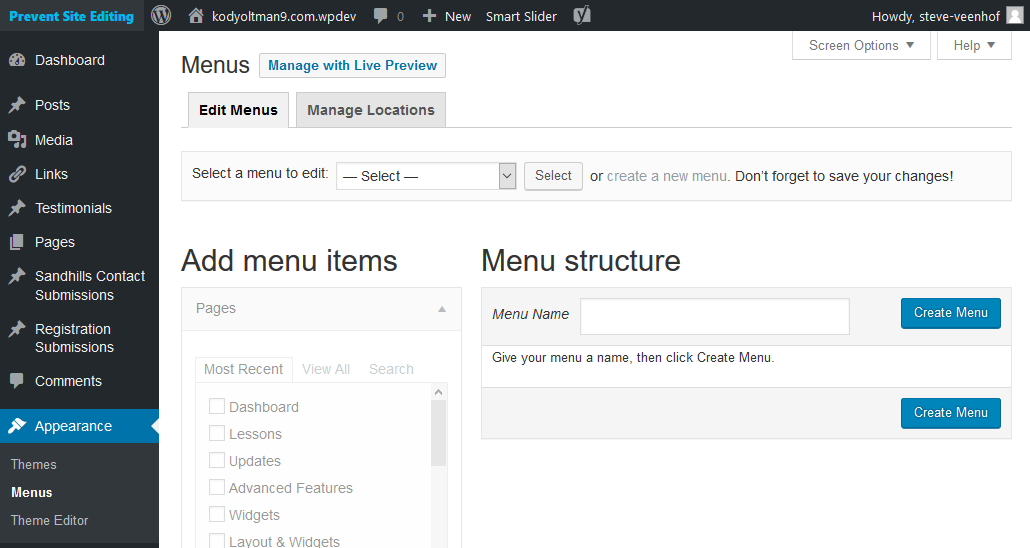
Adding pages to Menus in WordPress
https://codex.wordpress.org/WordPress_Menu_User_GuideBefore you can style the menu, you have to add some pages to it! This follows standard WordPress procedures. The documentation above does a great job explaining everything. I’ll give a brief overview. Once you’ve done it once or twice, it’ll be second nature.
-
Go to APPEARANCE > MENU
The first time you go here you will find an almost blank page. No menus are defined yet, so WP doesn't have anything to work from. Let's go ahead and define one. Just give your menu a name in and click Create Menu .
-
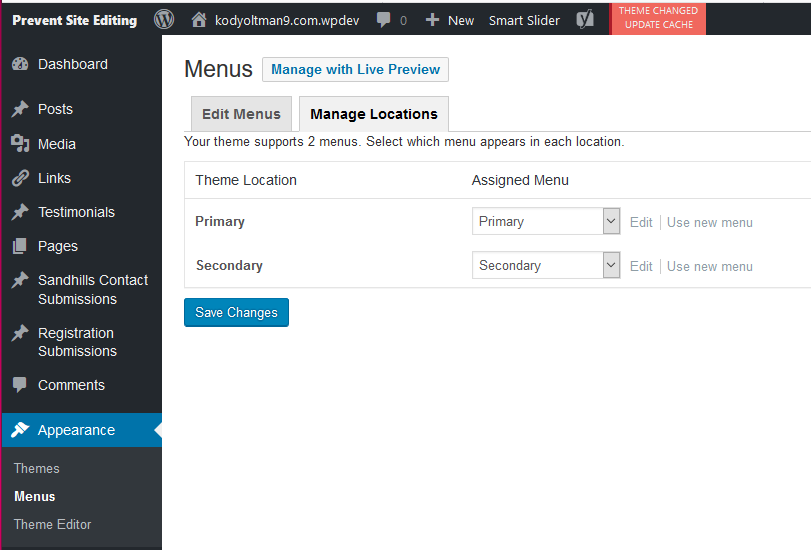
Assign your menu to a location.
Now that your new menu has a name, it exists. However, WordPress still doesn't know where that menu is supposed to go. WordPress will call that menu in your template through a Menu Location variable . This allows you to set up your templates by calling this location variable, then change out which menu is displayed there by just changing what menu is assigned to that variable.
You will have two menu locations (primary or secondary) to assign menus to by default. This does not have to correspond with the menu name, but I often do. You control this in the Mange Location tab of the Menus page.
-
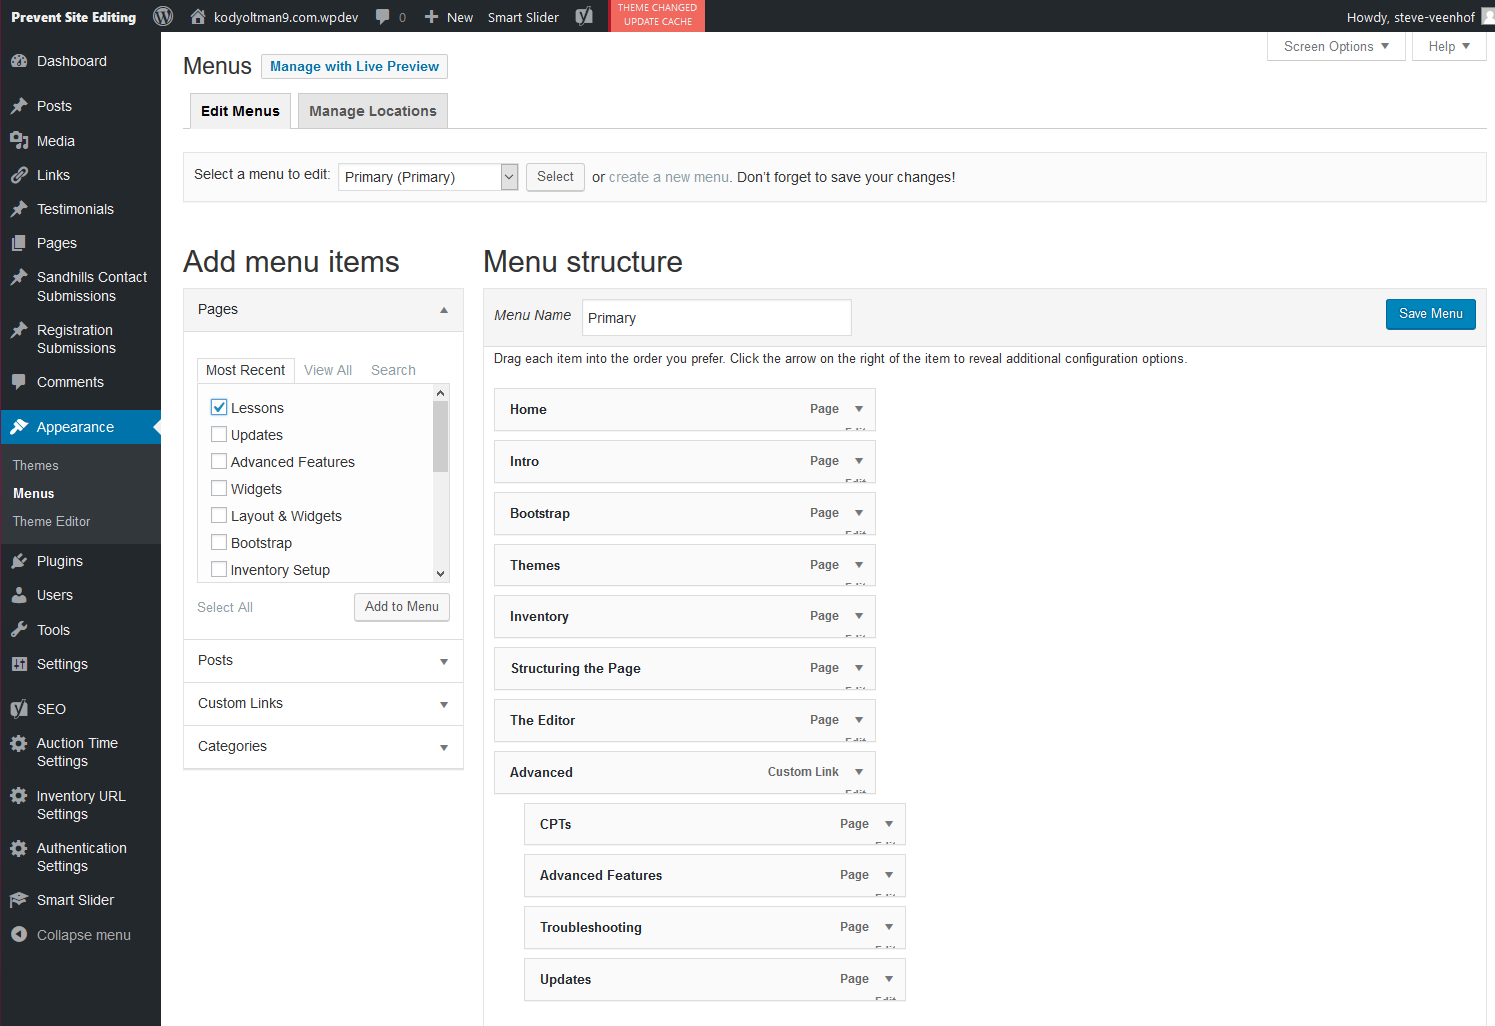
Add pages to the menu
.
In the left sidebar, check the boxes of all the pages you would like on the selected menu. Only PUBLISHED pages appear in the list. Click the ADD TO MENU button at the bottom of this box and the links will be created on the right.
-
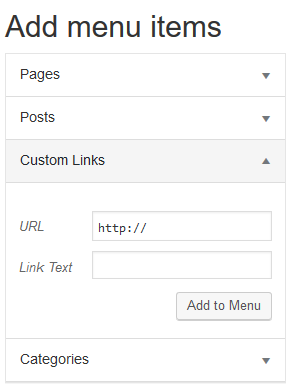
Create any Custom Links.
Sometimes, you will need to have menu links that link out to pages on websites outside your own, like a manufacturer website or a login portal. This is super easy as well. Just click the Custom Links tab , add the URL and the Link Text (the text that displays in the menu), then click ADD TO MENU . Your new link will be in the list with the rest of the pages.
-
Reorder the menu as needed
.
In the right pane, just drag each item up and down the list and drop the menu items into the correct order.
-
Create subpages.
You can nest things under one another to create drop-down menus by pulling them ever so slightly to the right. Nested items appear indented under their parent items. Getting the nesting right can get a little fiddly, so you may have to play around a bit to get them where you want them.
You may nest as many levels as you need, but try to limit the number of levels. Anything more than one level tends to be frustrating to navigate to for your users and often get lost on the site.
-
Don't forget to click SAVE MENU
If you make your changes to the menu and they don't reflect on the front of the site, it's probably because you forgot to click SAVE MENU. I know I do this all the time.