Creating new pages
a Sandhills Page vs. a WordPress Page
This one is pretty simple. WordPress pages are basically standard pages that must be edited in the backend of WordPress. They do not have the added secret sauce that allows the editor to add Layout Regions or Widgets. They do work fine, but you will almost always use Sandhills pages.When to use the Back-end WordPress Editor vs. the Front-end Sandhills Editor.
You will use the front-end Sandhills Editor for almost everything . There are only two main functions you do need to use the Back-end for: changing your page templates, and adding pages to the menu. Other than that, there's not much call for the back-end WordPress editor.If you do use the WordPress editor on a page, it will still work. If the page your editing is a Sandhills Page (created from the front end of the site), the content put into the back-end will output between the header and any front-end content. If it was created on the back-end, you won't have the option to add widgets and will only be able to edit the page from the back-end.
Either way, depending on how your template is set up, this content may be added outside of normally formatted areas. So this content may look odd compared to the rest of the site. This is why we don't recommend using the standard back-end WordPress editor for most editing.
Creating a new Sandhills Page
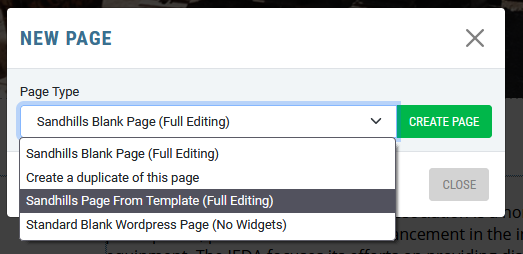
1) Click “+ New > Page ” to Add a New Page.
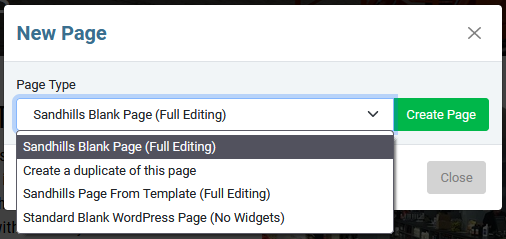
Once you click the button, you should get a pop-up asking you if you want to do a SANDHILLS BLANK PAGE, CREATE A DUPLICATE OF THIS PAGE, SANDHILLS PAGE FROM TEMPLATE or STANDARD WORDPRESS PAGE . You will generally choose Sandhills Blank Page.
- Sandhills Blank Page (Full Editing)
This is the one you will probably use most for new pages. It creates a blank slate with just the sites header and footer, no widgets or anything.
- Create a duplicate of this page
This is great for quickly creating a small series of similar pages (like locations, staff bios, etc.) When you create duplicated page, every Section, Widget, word and image is duplicated. It is literally a direct copy of the page with a different page title.
- Sandhills Page From Template (Full Editing)
These may or may not be set up for you by your Sandhills Designer. This is an easy way for you to have different visual themes with similar looks and repeating graphic elements for different sections of the website. This is similar to the duplicate page option, but you duplicate a predetermined template page that would likely not have page-specific content that would need to be removed. More on these here .
- Standard Blank WordPress Page (No Widgets)
You probably won't use this much. It is here in case you very specifically do not want to be able to add Widgets to the page. These pages MUST be edited in the back-end using standard WordPress tools.
2) Give your page a unique name and choose your Options.
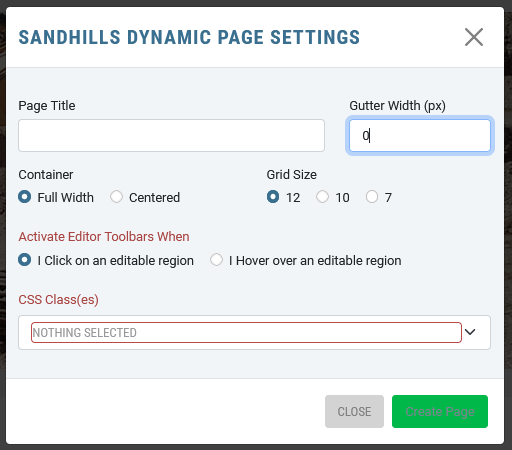
- Page Title
Type in your page title. Each page must have a UNIQUE title.
- Gutter Width (px)
This sets the default margin and padding on elements. If you set it to 0, everything will touch seamlessly. If you leave it at 30, everything will have 15px of space on the top, bottom, left and right.
- Container
This is another Bootstrap class. If you want the site to be centered in the background at a maximum width of 1200px, choose Centered. If you want it to go full width no matter how wide the screen, choose Full Width. Either way, at any screen size smaller than 1200px the site will stretch full width.
- Grid Size
Once again this is based on Bootstrap defaults. A 12 column grid is the most flexible, but if you specifically need 5 or 7 columns, you may change it.
- Gutter Width (in pixels)
This sets the default margin and padding on elements. If you set it to 0, everything will touch seamlessly. If you leave it at 30, everything will have 15px of space on the top, bottom, left and right. - Activate Editor Toolbars When
You can choose to activate the Dynamic Editor Toolbars either when you mouse over a content area of a Widget or when you click on a content area of a Widget. The default value is click.
- CSS Class(es)
You can choose CSS classes that you'd like to use to style the overall page from the drop-down menu. These will have been already set up by your Sandhills Designer.
3) Click on the Layout Tab to define your page structure.
4) Add Widgets to the page structure.
5) Add Content.
6) Save and Publish the page
We will get more into the options on the other tabs later in the document. But here’s what you need to know right now.
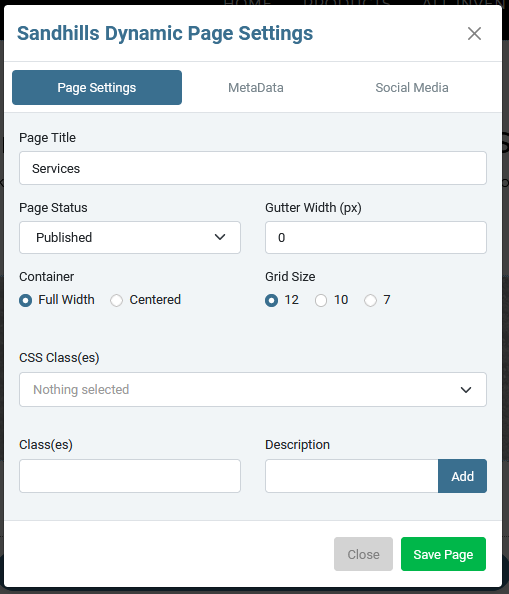
- Page Status
By default all pages are created in DRAFT mode. These cannot be seen by anyone that isn’t an admin and these pages can’t be added to the menu. Switch this to PUBLISH and it will be visible to everyone and you may now add it to the menu in the next step.
- Everything Else
The rest of this window is basically another place that has the exact same options as when you created the page in Step 2. This is the easiest way to change those options after the page is created.
- Metadata
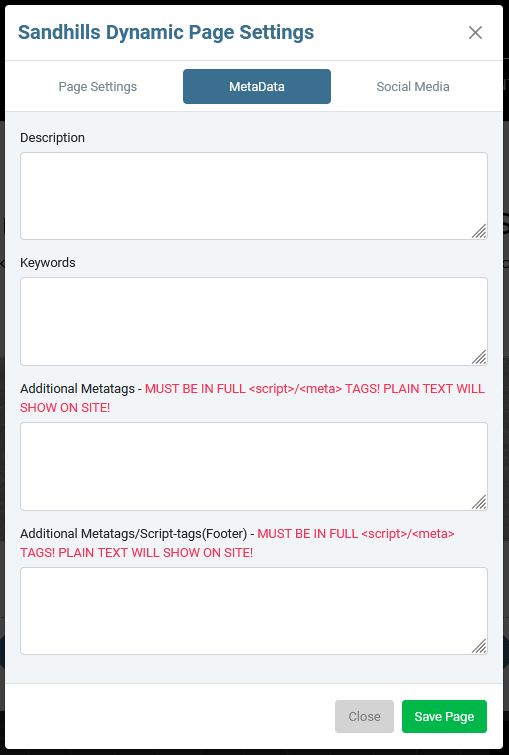
This is the second tab. We won’t go into too much detail, but this screen is where you add your page specific Metadata.
The Description won't show up on the page, but will show up as the page's description under the title in search returns. Keep it short and very relavent to the content.
Keywords are just comma separated phrases that you want this page to show up in searches for. If you don't fill it out, Google will try to do it for you based on page content.
Additional Meta tags/Script-tags are little snippets of code that you need inserted on a page. These are very rarely used. This is here for things like page-specific analytics to track marketing campaigns. Be aware anything you put in these boxes MUST be in the proper HTML tag or it will show up as text either above or below your site.
- Social Media

The third tab houses metadata fields specific to Twitter and Facebook, including descriptions and default images that will show if a link is shared for that specific page.
7) Add to menu in back-end.
This is described in the Menu section . This step isn’t really necessary right now and can be done once you have all the content on the page. In fact, it can’t be done until you publish the page, so it is recommended that the content be added and approved before you add the page to the menu.
Adding Sections to your page
There are two ways to add Sections to your page. There is a button below the bottom Section on the page that will allow you to quickly add a section to the bottom of the page layout. This is the quickest and easiest way to add a Section as you are working.

Click the ADD SECTION button. You will get a modal that pops out and allows you to choose the appropriate layout grid for your needs.

Choose the grid that makes the most sense and click ADD SELECTED SECTION . That's it!
The second way to add Sections to a page is with the Layout button in the top editor bar. This way gives you a graphical representation of the structure of the page and allows you to add new sections or edit the column widths of existing Sections.
Click the LAYOUT button in the top row of the editor.
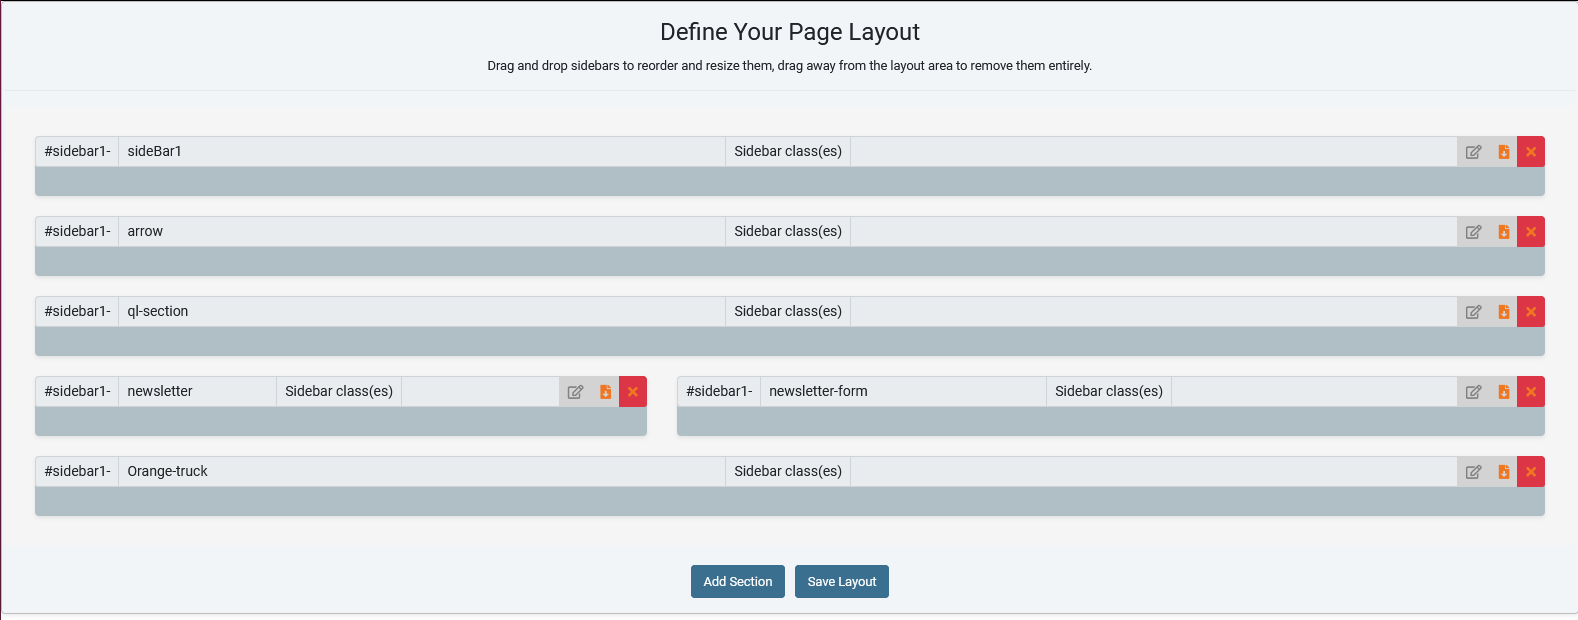
A new management area will appear above your content on the page with a grid of grey boxes that represent the grid of the Sections on this page. There is only one full-width Section added by default. Add or resize Sections as needed for your design. The above image shows a full grid from a real customer's home page.
You may define as many Sections on a page as you need to create your page structure. You can use them to divide the page both vertically and horizontally. For the example above, the designer started with three full width Sections with slideshow, a specially styled graphic divider (the ID is #sidebar1-arrow), then another full width Section to hold the content widgets. They followed this with two Sections divided roughly 40/60 with a map/content area and a contact form. The final Section is a full width area has a graphical call to action that directs people to their inventory.
To add a new Section, click the ADD SECTION button.
The standard Add a Section modal window will pop up. Choose the grid you want to use. If you would like to style the section, give it a unique name in the SIDEBAR ID field. It will always have the page ID as the first part of the ID, but giving it a unique name will help you keep track of what is what in your style sheet.
A new management area will appear above your content on the page with a grid of grey boxes that represent the grid of the Sections on this page. There is only one full-width Section added by default. Add or resize Sections as needed for your design. The above image shows a full grid from a real customer's home page.
You may define as many Sections on a page as you need to create your page structure. You can use them to divide the page both vertically and horizontally. For the example above, the designer started with three full width Sections with slideshow, a specially styled graphic divider (the ID is #sidebar1-arrow), then another full width Section to hold the content widgets. They followed this with two Sections divided roughly 40/60 with a map/content area and a contact form. The final Section is a full width area has a graphical call to action that directs people to their inventory.
To add a new Section, click the ADD SECTION button.
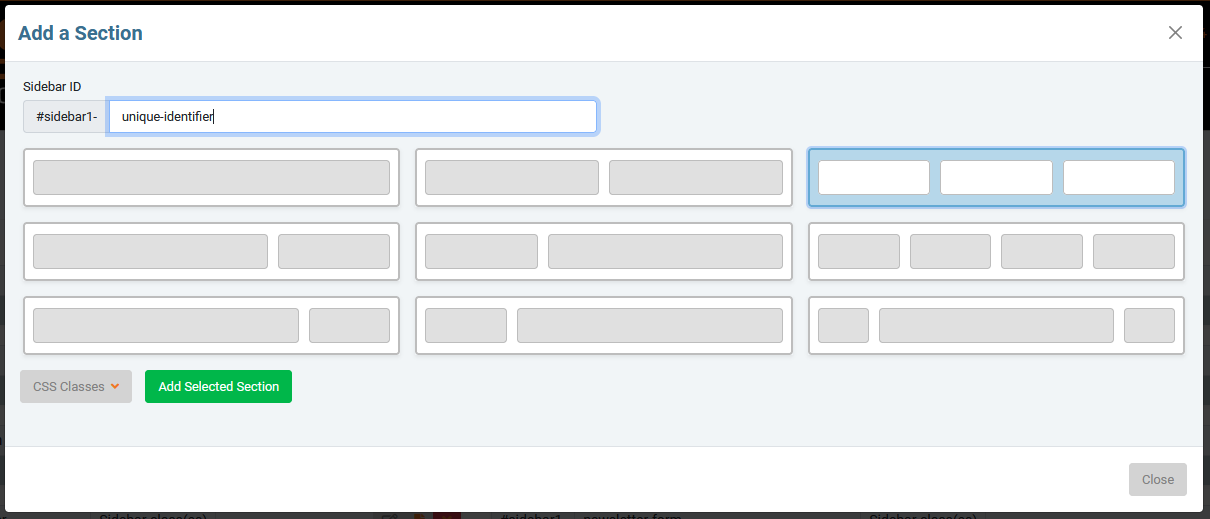
The standard Add a Section modal window will pop up. Choose the grid you want to use. If you would like to style the section, give it a unique name in the SIDEBAR ID field. It will always have the page ID as the first part of the ID, but giving it a unique name will help you keep track of what is what in your style sheet.
For the example above, I've chosen to use a 3-column grid and gave it the ID "unique-identifier." Click the green ADD SELECTED SECTION button to add this to the page's layout.

Notice that the IDs for the three sections you will define in your style sheet would be #sidebar1-uniqueidentifier , #sidebar1-uniqueidentifier2 , & #sidebar1-uniqueidentifier23 . All sections can be styled independently by using these IDs.
Resizing & rearranging Sections on a page
Resizing and rearranging Sections is a simple drag and drop procedure.Sections only resize from the lower-right corner. If you need to make a Section bigger or smaller, resize the Layout Area by dragging the bottom-right corner to the right or left to expand the box to the appropriate size. If you have multiple Sections in a row, enlarging the big Section will make the following sections wrap to a new line.
Once your Sections are resized, you can drag sections into the correct order by clicking the darker stripe in the bottom of a section and dragging it to the correct position. Any widgets inside the Section will re-flow to the new sizes of the Section, but should be otherwise unaffected.
The Editor will also allow blank spaces without Sections if your design calls for that. It's a good way to create margin along the edges of your content area.
When you have your Sections set up, click the SAVE LAYOUT button to lock in the layout. The page will save and refresh. When the page reloads you will see all your new areas and you can start adding widgets to them.
Adding Widgets
Adding Widgets is super simple as well. Make sure you are in edit mode by clicking the “ Sandhills Editor ” Icon at the top of the page. You should see borders around the available Layout Area sections that you can add Widgets to. Now hover your mouse over the Section you would like to add a content Widget to. You should see the "+" at the bottom change to an “Add a Widget” button show up at the bottom of the Section.
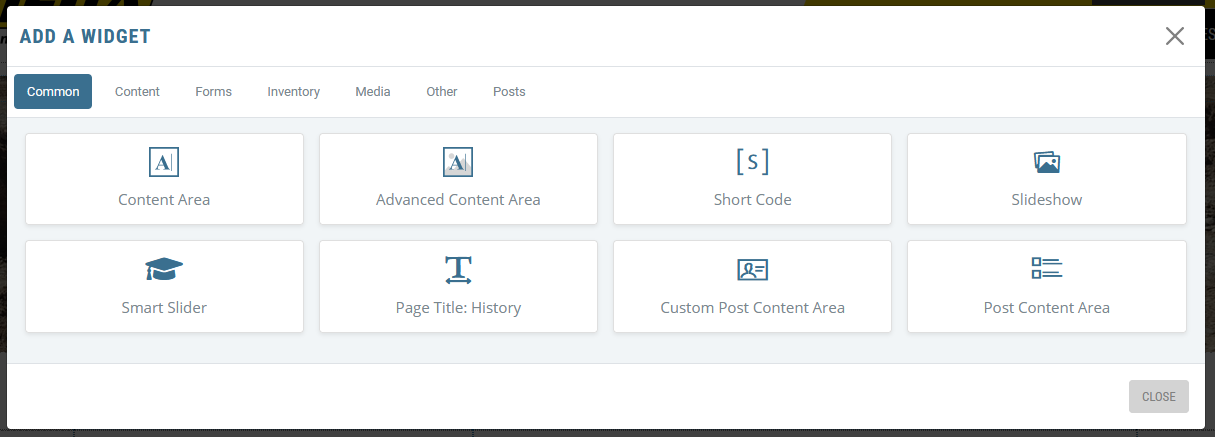
When you click the “ ADD A WIDGET ” button, you will get a pop-up that is divided into tabs that house different groups of widgets.
Available Widgets
When you click the “Add a Widget” button, you will get a pop-up that is divided into tabs that house different groups of widgets. We are constantly developing widgets, so don’t be surprised when new ones pop up. The basic widget tabs we have right now are Content, Media, Forms, Google, Testimonials, and Other.
Editing or Deleting existing Widgets
Editing and deleting widgets is as easy as adding them. When you hover your mouse over a widget, the Edit and Delete widget icons appear in a centered block above that widget. They will hover above any page content that happens to be above that widget.

Every widget has edit/delete functionality. However, the edit icon will not work on most new widgets until the page is saved. The reason for this is that the settings must be saved in the database before the setting can be read back into the widget and altered. For this same reason, once you edit a widget you will have to save or reload the page in order to edit it again.
Some widgets that are very simple will also not be editable, such as testimonials, search boxes, Short Codes, etc. These usually only have 1 setting and it’s easier to just delete them and re-add them with the new settings.
The Edit Widget button will open up the widget settings dialog box so you can change any settings. It’s just like adding a new widget, but all your content will stay in place. Any existing settings should be preloaded in the widget when you edit it.
The Delete Widget button will delete the widget permanently. There’s no getting it back. But don’t worry, we do make you confirm you want to delete the widget before it is deleted permanently.
Please Note: These are the same icons that will appear above any inserted elements (images, buttons, tables, etc.) to allow you to edit their settings or delete them from the content. They will always appear directly above the element they control. It should be obvious whether they are affecting the entire widget or just an inserted element based on their position.
Classing your Pages, Sections & Widgets
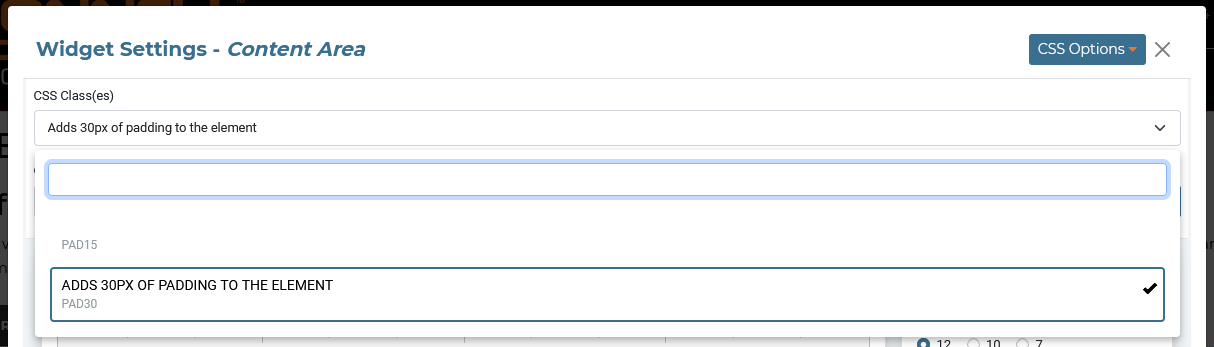
When adding Sections and Widgets, your Sandhills designer may have set up some pre-formatted classes to style these elements for you. These are very easy to implement. Just choose the correct style from the drop-down menu.
Adding a class to an element
This may be a little confusing at first glance, but it makes complete sense once you've used it once or twice.Classes are always added to elements via the CSS CLASS(ES) multi-select menu .
Just select any or all classes you would like to add to the element. You will see the the comma separated list being built above the drop-down menu of available classes.
NOTE:
All classes are stored individually for each type of element. For example, the list of classes for Editable Areas is different and independent of the list of classes for Editable Area Backgrounds because they are different types of widgets. This helps manage the length of the lists and also helps you choose the right classes.Creating Content Pages from Templates
Page Content Templates are an easy way for you to have different visual themes for different sections of the website without setting up actual WordPress templates. This is similar to the duplicate page, but you duplicate a predetermined template page that would likely not have page-specific content that would need to be removed.
When you create a page from a template, all structure and content is duplicated from this template page. These are designed for situations where you will likely be creating a series of pages and you need to have certain things already set up for them (like title graphics, classed editable areas, contact forms, etc.)
Once a page is created from a template, it creates an exact stand-alone duplicate of the template page selected down to the letter, but with a new page title. Once the page is created, it is it's own entity. Updating the template itself will not update any existing pages.
Once a page is created from a template, it creates an exact stand-alone duplicate of the template page selected down to the letter, but with a new page title. Once the page is created, it is it's own entity. Updating the template itself will not update any existing pages.
Please Note: Your Sandhills Designer will have created these templates for you already if your site uses them.
Creating a new page from a template
- Select NEW > PAGE from the top menu as normal.
- Select the Sandhills Page From Template (Full Editing) button from the drop-down menu.
- The New Page Template screen will pop up. Give your new page a Title and choose the correct template from the drop-down menu.
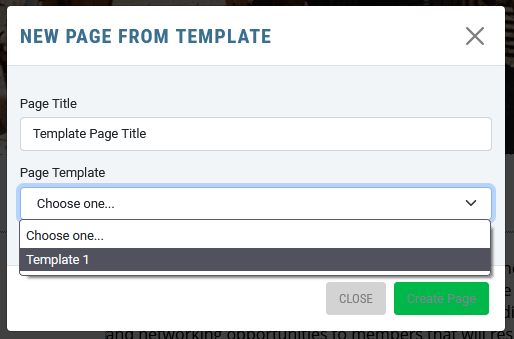
- Click Create Page and you are ready to start entering content! The new page will already have your widgets in place as set up in the template. You can now modify the existing content included in the template or add new widgets and content as needed.