the dashboard
This is the first screen you will see when you click the Smart Slider tab on a new website.
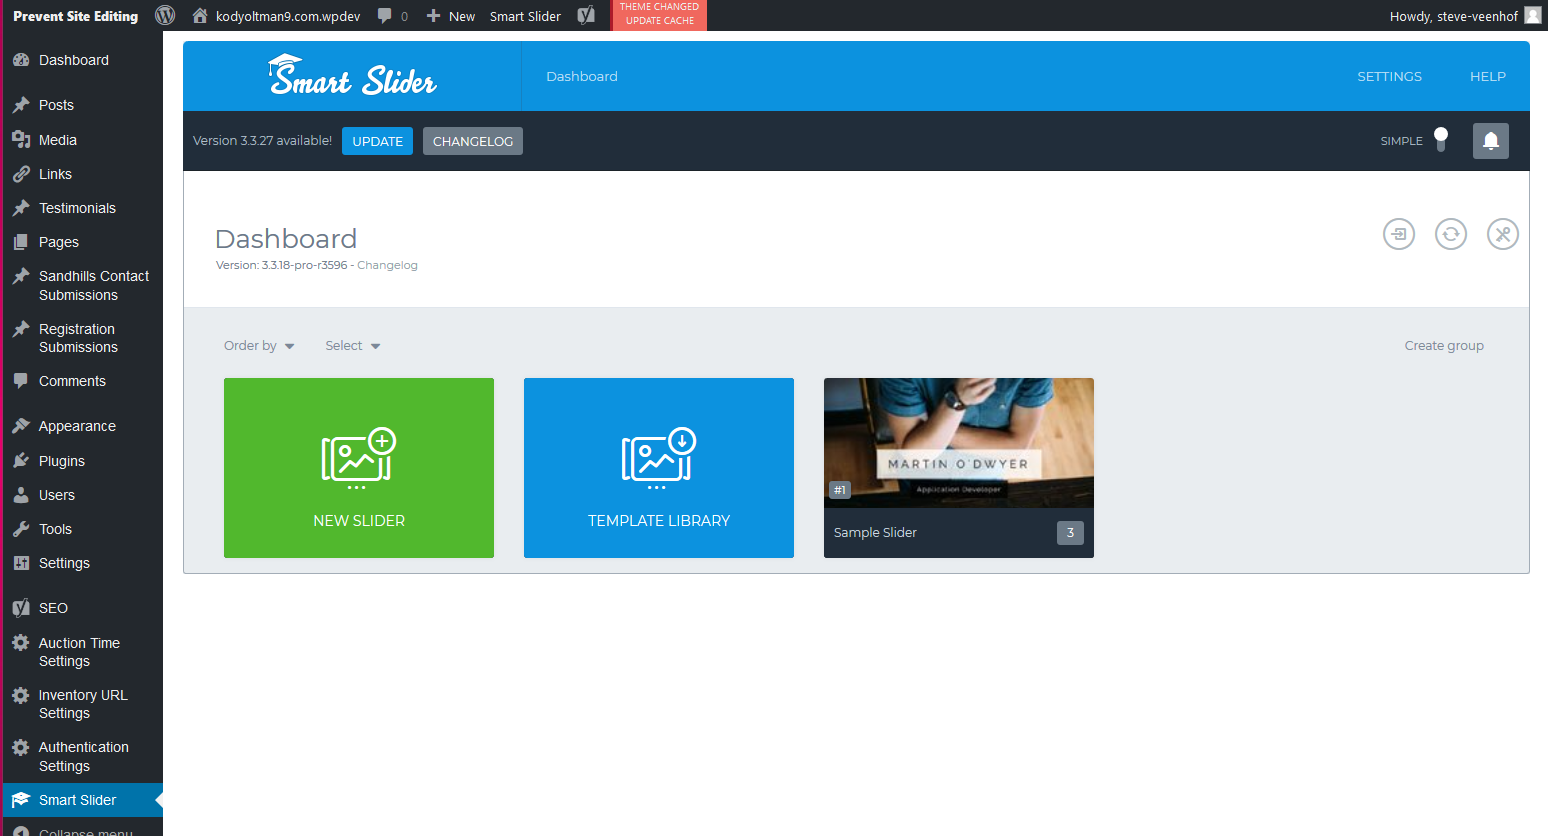
- The green new slider button is the one you will use most. It starts from a blank slider and is usually the best choice for most applications.
- The blue template library button will open a popup with dozens and dozens of slideshows templates that you can then customize. If you want to use one of these, please choose a free one. We have the Pro version of the tool, but you still have to buy many of these pre-made templates.
- The last sample slider button is simply an example slider. you can ignore this slider, modify it for your own purposes, or delete it. it's up to you.
- There will likely be one or more additional slideshows in the list. If there are, those are sliders that your Sandhills Designer has already set up for you and are likely already in use on the site. To edit an existing slideshow on your site, just click on its thumbnail.
how to create a slider
Click the green NEW SLIDER button. you will get a pop-up window that will allow you to make the most basic settings for your slideshow.
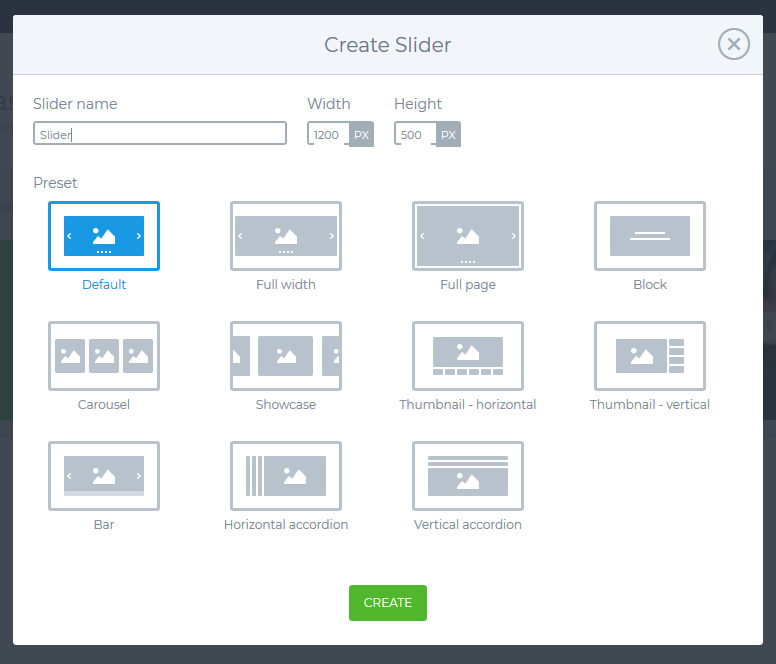
- Give your new slider a unique name and overall dimensions.
- Choose the type of slider you want. Different settings will yield different functionality in how the slider is set up and how transitions work. It should be fairly obvious which works best for your design.
- Click CREATE .
Now you will come to the blank slider screen. this is where you will start creating the individual slides. 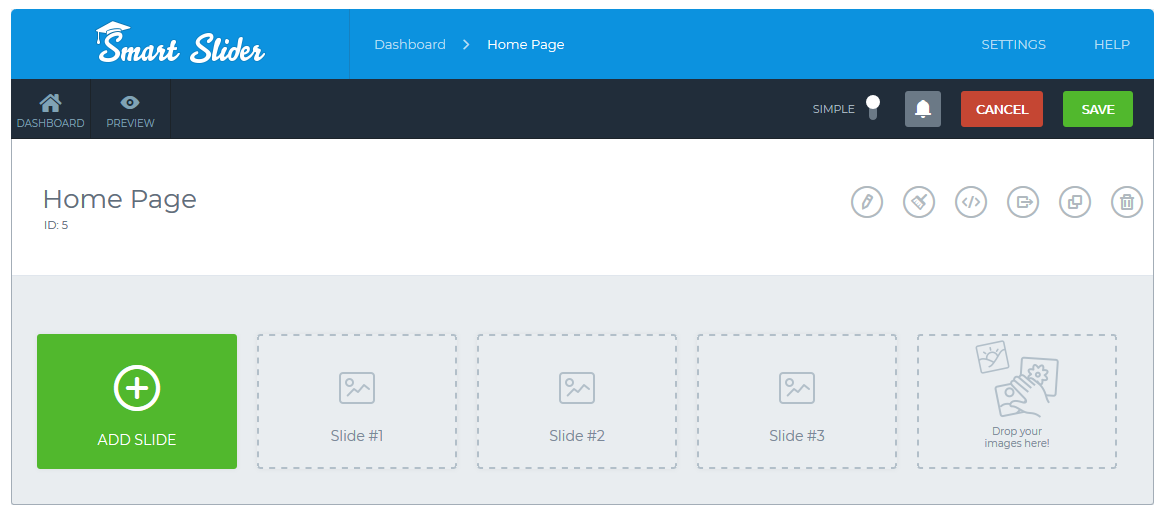
There are a couple ways to create slides , but they all pretty much boil down to adding the background to the slider and then piling on the content in layers above that background.
- The easiest way to create a slide is to just drag and drop your image anywhere into the light grey area and it will be added to the next open slide slot. The slides can also be rearranged by simply dragging and dropping them into the order you want them.
- When you click the green ADD SLIDE button, a dark bar will open up above it and you will get a choice of slide options to choose from. Each functions a little differently and is outlined in Specialized Slides below.
- One of the options that will pop up is the LIBRARY button, which is actually pretty cool. It has a bunch of pre-formatted slides with fake content for you to customize. It's a great way to get to know some of the possibilities of Smart Slider and how to use it. It also makes it easy to set up complex slides by just changing some content.
Building Your Slides
Now that you have your backgrounds added to the slides, just click on one to edit the slide and add content.
Adding Layers
The work area is pretty simple. You have your canvas, which is the size you determined in step 1 with the background image you chose superimposed on it.
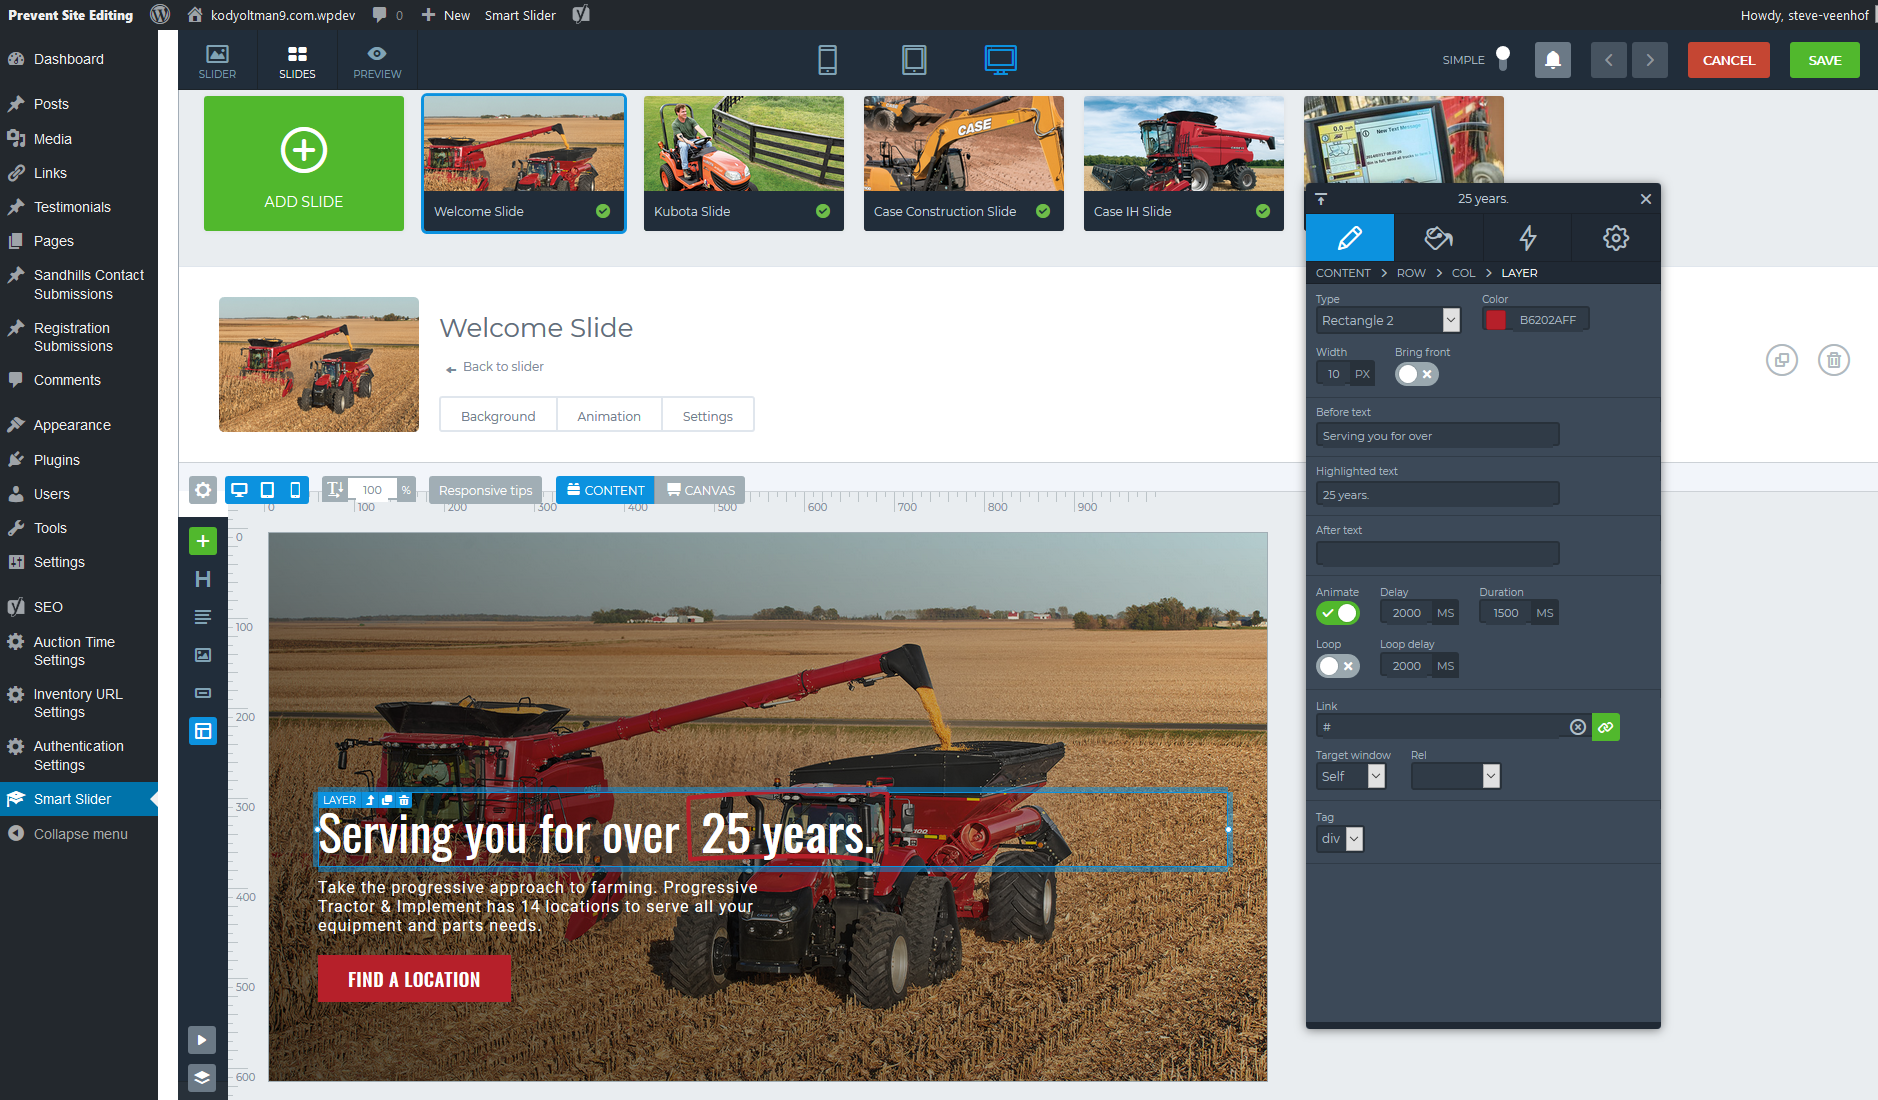
To add a layer, just click any of the buttons on the left side of the slide area.
- The green + icon = Gives you the full menu of layer all options. Including structure layers. (more later)
- H icon = Adds a heading layer
- Paragraph icon = Adds a text layer
- Image icon = Adds image layer
- Button icon = Adds a button layer
- Grid icon = Adds a Structure Layer (different grid )
- Play icon (bottom) = Plays the slide animations in the work window.
- Layer icon (bottom) = Opens a timeline at the bottom of the screen to visually see the timing of animations, etc.
The type of layer you add will determine the options you have in the pop up editing window.
The layer editing window
When you click on any layer in the preview pane, the editing window will activate and you can change settings. You will do everything from typing in text to changing formatting and adding animations in the popup window, not directly on your slide. You click on the different elements in the preview to select layers, but that is all you do on the preview pane.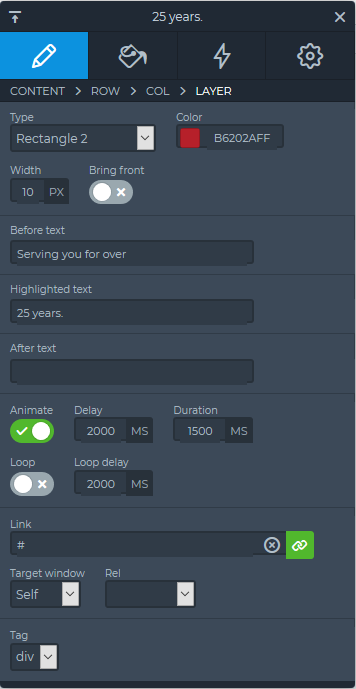
- The pencil edits the content on the layer.
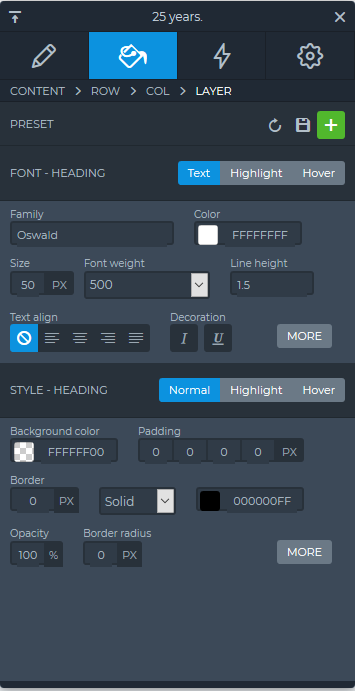
- The paint bucket changes the style and color of the elements.
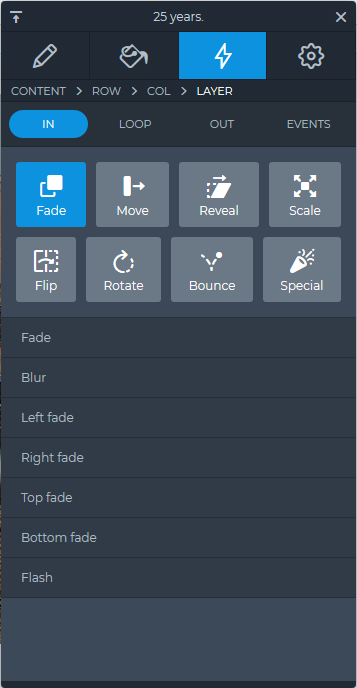
- The lightning bolt is the animation tab.
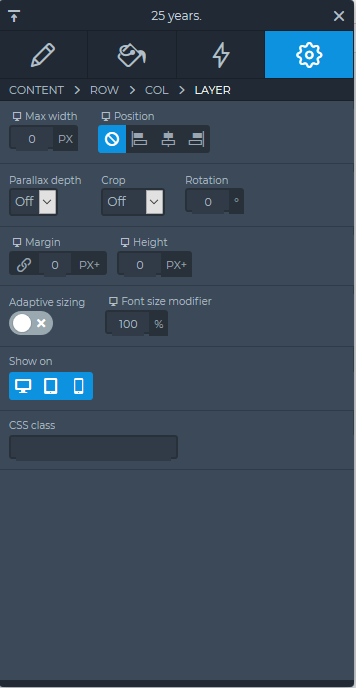
- The gear is the settings tab.
Because these windows are dynamic, we won't go through them here. The best thing to do is to play around with the different kinds of layers and pay attention to what each of those settings are for each of those layers.
Content Mode
This is the default mode. It will stack elements in the slideshow on top of each other in full-width rows. You can drag and drop the layers to rearrange them. To add additional space between elements, you can add margin (usually in the settings tab).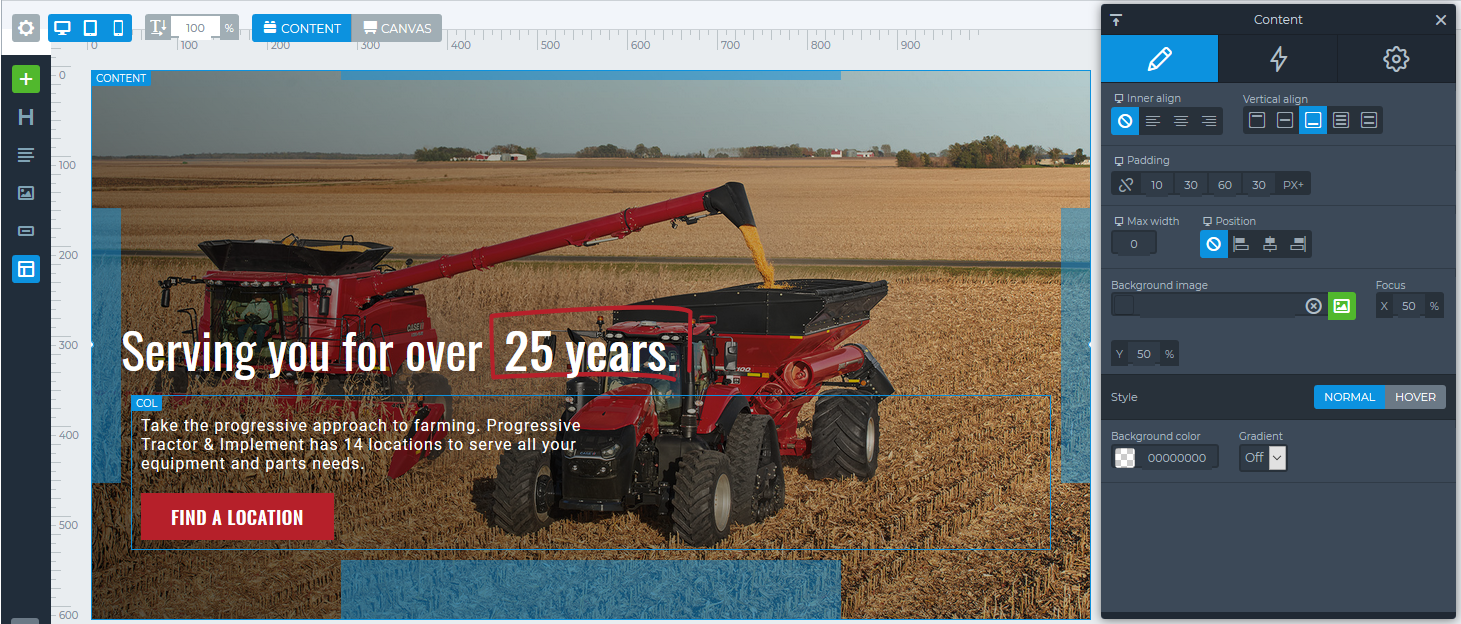
You will set the vertical alignment to choose whether everything wants to stack from the top, bottom or centered from the middle. As you add layers, all the other rows adjust to stay centered vertically.
This mode is a really easy way to add content and make sure it always aligns nicely, no matter the screen size. It does limit your freedom a bit, but it will likely give you the overall best results on every screen resolution.
Canvas Mode
Sometimes you need a bit more finite control of element placement than you can achieve in content mode. That is where Canvas Mode comes in.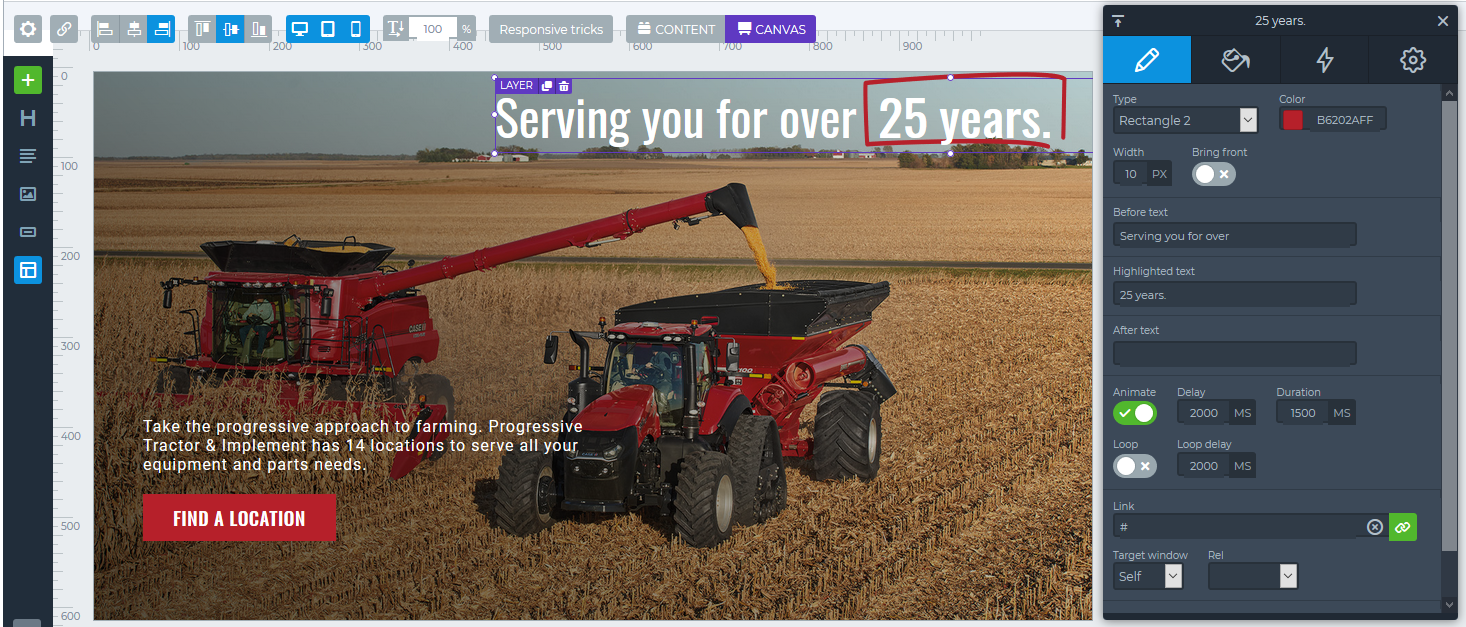
When you are in canvas mode you can rearrange elements anywhere in the window by simply dragging them to the correct location and dropping them. This adds a lot of flexibility, but be sure to check how this looks at different screen sizes and breakpoints.
Adding Structure Layers
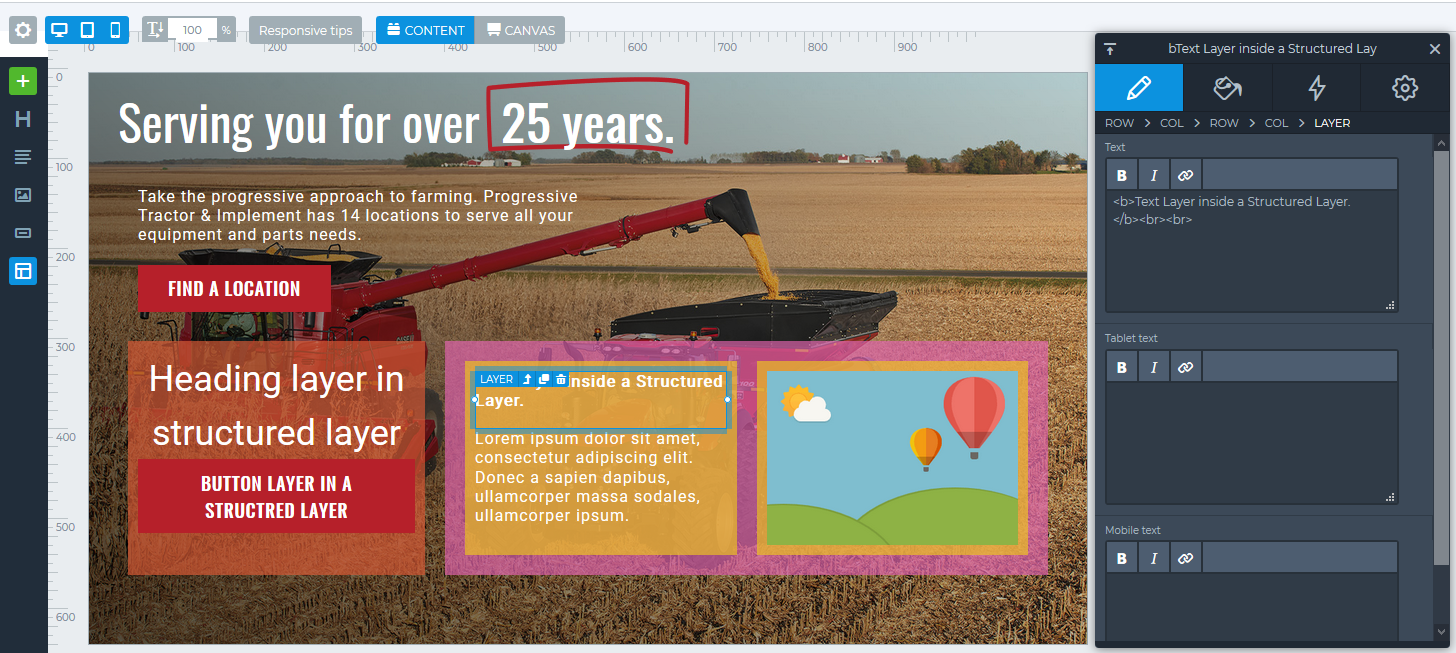
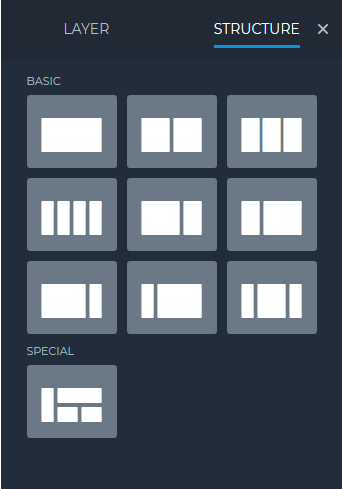 Structure layers are great for creating a consistent grid structure to your layers. This makes it very easy to keep a consistent look between different slides in a layer.
 Each block added by a structure layer has independent settings, so it is easy to use these as text blocks or to add a block of color that will overlay your background image to enhance text readability.
The above example uses the SPECIAL grid. You will first create your grid by manipulating settings in the layer window. You can add background colors and images, change the percentage widths of your columns, etc.
Additional Kinds of Slides
There are a few additional kinds of slides that are useful for making your Smart Slider even more dynamic. Below is an example of these slides and what they can be used for.
Adding specialized slides to your slider
There are lots of things you can do with Smart Slider. Most of the time pictures will be all you want, but there are definitely lots of applications that will lend themselves to these more specialized types of slides.
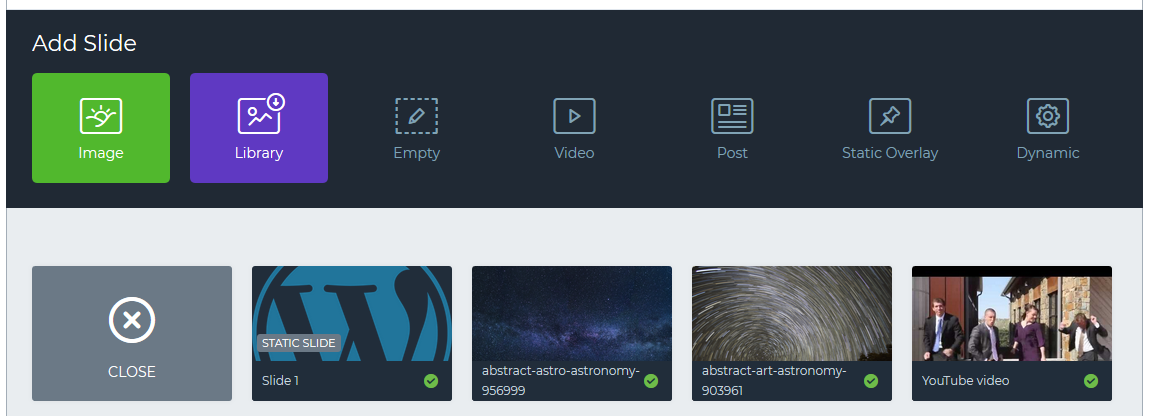
creating a slide from the Library
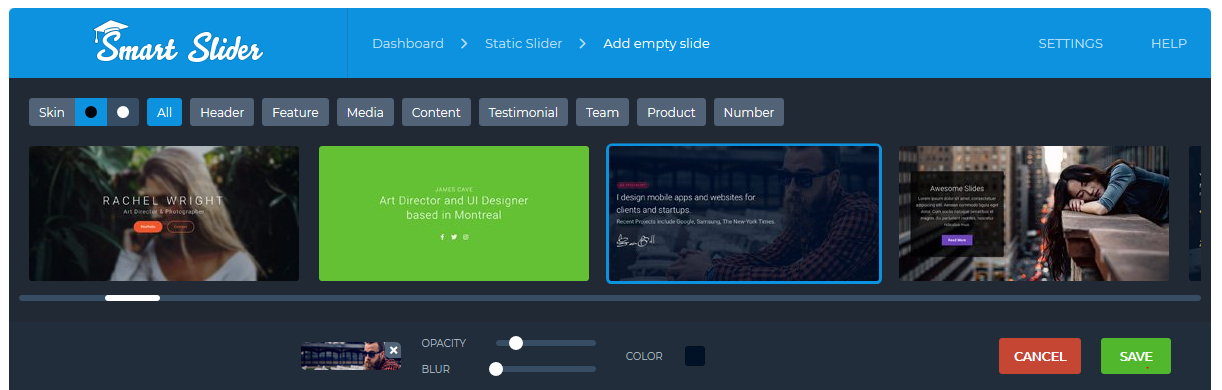
The Library has a bunch of pre-formatted slides with fake content for you to customize. It's a great way to get to know some of the possibilities of Smart Slider and how others have used it.
As you click on each thumbnail, it loads it into your slide editor down below for you to preview and play with. Modify the slide until your happy and save it!
Note the Opacity and Blur functions below the thumbnails. This isn't unique to the Library, but it's a fun tool to play with and get the right look for your slides.
static overlay slides
The aptly named Static Overlay Slide displays the content from that unique slide over the top of every other slide in the slider, while allowing the other slides to move behind it. You can still add animations, but they will only play on initial page load and will not change as the slides move below the content.
The background of this slide is irrelevant as all other slides will overlay the background. This also doesn't take a spot in the rotation. It is always visible, so there's no defined place for it to sit in the rotation.
To create a Static Slide, just click the green NEW SLIDE button to get the dark bar and click the STATIC OVERLAY icon that is second from the right.
The slide that is created will be marked with an overlay that says STATIC SLIDE (the first one in this case). This is the slide you edit your content on. All the rest of the slides will flow underneath it.
You may still add text, images, etc. to the individual slides, but they will be layered underneath the static slide. Make sure your static slide doesn't hide important content underneath, especially on different break points. For example, the white Sandhills Global logo on the lower left corner of the second slide is embedded in that slide itself to show how it moves relative to the static slide's content.
Static Overlays are pretty cool, so be creative and come up with innovative uses for static pieces of content that don't move relative to the rest of the slides underneath it.
video slides
This is super simple. Just like the static slide, click ADD SLIDE > Video icon . You will be prompted to enter the URL of the video you wish to play. This can be a YouTube video share link, a Vimeo share link, a .mp4 link from the media gallery, or really any direct link to the video file.
Once the slide is created, you can edit the settings (such as autoplay, the volume level, the start and stop times, etc). Be aware that there will be a lag as the video loads, so the smaller the file size the better.
POSt slides
This one works, but has limited usage. This mainly pulls the text from a post into a slide and adds a read more link. This would be nice for a news feed or reviews. If you have a use for it, play around and see what you can come up with!dynamic slides
This is complex, but can be very powerful when used correctly. This will allow you to control the slide contents from a feed, so that we can change multiple sites from a single location. However, you can also set up a Custom Post Type and just edit that CPT to populate content in the slider. This is obviously pretty advanced, and you may need to reach out to a Sandhills Designer to get this set up.
adding a Smart Slider to a page
There are several ways to add a smartslider to a page, but most of the time you will add a Smart Slider by either adding the SMARTSLIDER WIDGET to a page, or using the Shortcode .
using the Smart Slider widget
This widget is another simple one. It just gives you a list of Smart Slider Slideshows and lets you choose one to add to a page. This is mainly just to make your life easier by not having to mess around with shortcodes.
To add a Smart Slider widget, just click the ADD A WIDGET button and choose SMART SLIDER from the MEDIA tab.
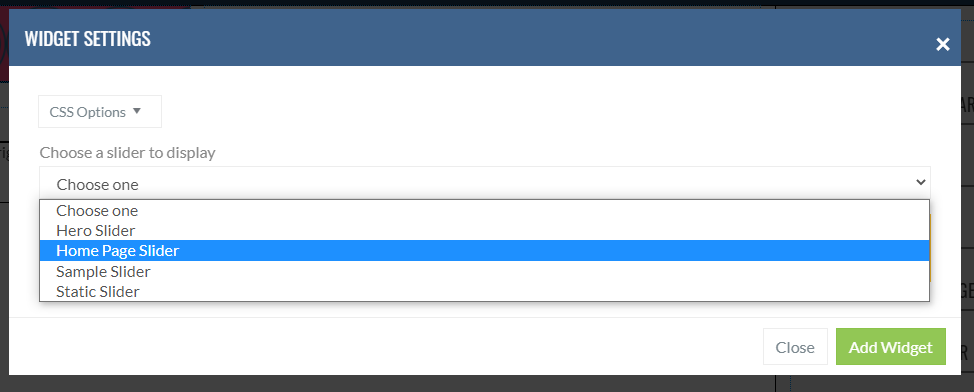
Just choose the correct slideshow name from the list in the Widget Settings window and click ADD WIDGET. The drop down list is dynamically generated from all of the titles of your Smart Slider slideshows.
The first time you add a Smart Slider to the page, it most likely will not load after you insert it. You will just see the shortcode for the slider. Please save the page and you will see it render in the correct location.
Embedding Smart Slider in a page
There are three default methods of embedding a slider in a page that don't involve using the Smart Slider Widget. All three are located in the PUBLISH tab at the root of the individual slider. You will have options for the Shortcode, Page or Post editor, or PHP code. They all essentially function the same, but have different usages based on how the page is structured and where the slideshow needs to sit in the site.
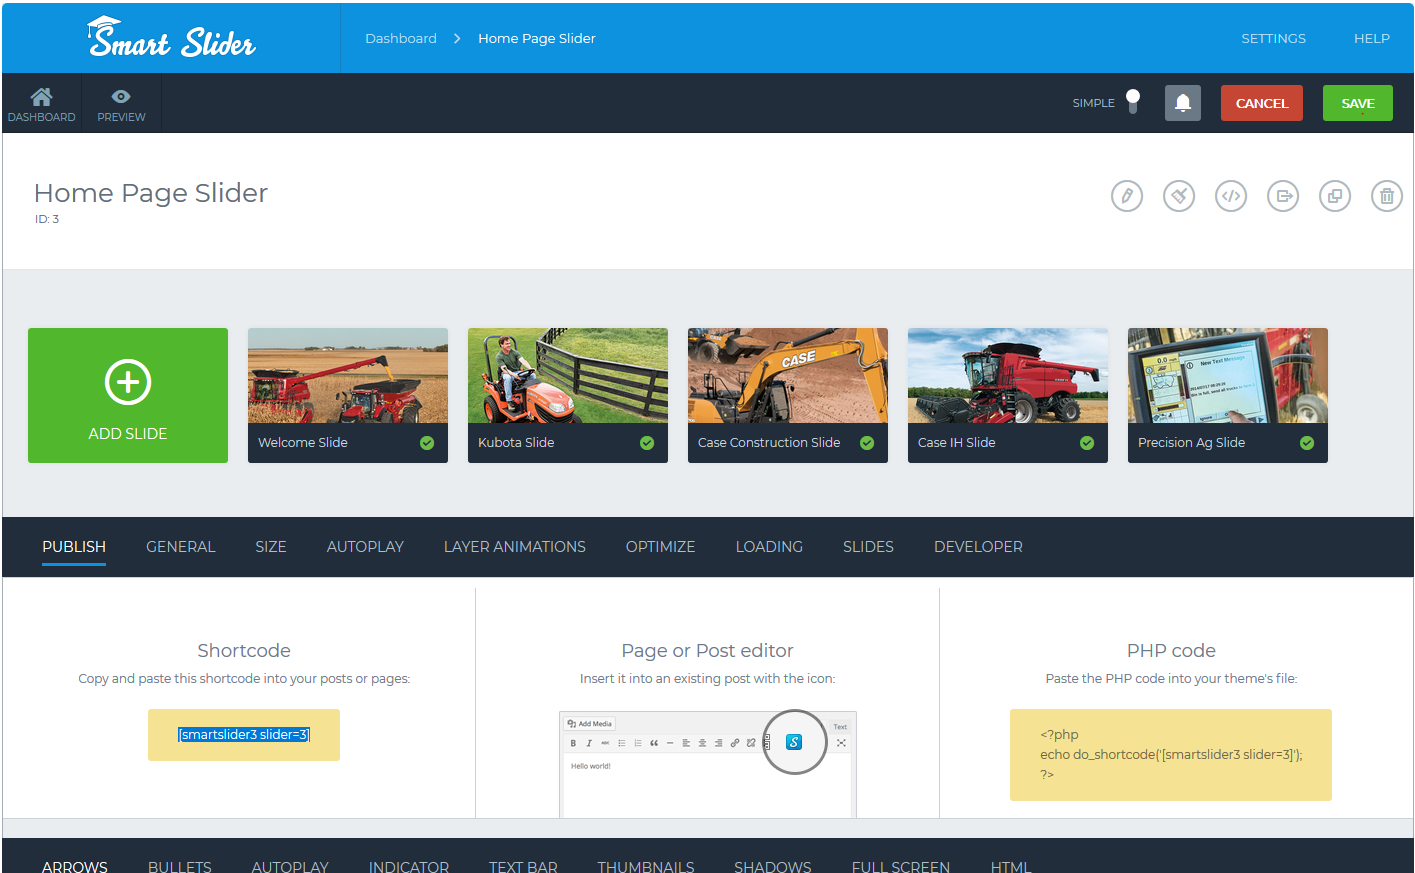
Shortcode
The shortcode is the way you will most often embed a slideshow. It's a fairly simple task. Just add the shortcode widget to a page paste in the shortcode. After the page is saved, the Smart Slider will sit in the widget position. Easy-peasy.
You can theoretically also just paste the shortcode into the editor, but this is a bad idea. It will work the first time, but if you ever have to edit and re-save a page, the whole thing will not display properly and you'll have to delete it out and re-add the shortcode. This creates a large failure point for you when you go back to edit those pages. It's probably not worth the hassle. If possible, we recommend you just use the widget.
The reason this happens is that once the page is saved, WordPress replaces the shortcode with a snippet of code that actually displays the slider. This code violates some security settings built into the editor itself to prevent code injection and it will strip out the tags needed to make the Smart Slider work.
Page or Post editor
This is for adding a Smart Slider through the default WordPress editor. It's unlikely you will use this option. However, if you do want to use it, there is an icon in the WP editor, just click it and choose the slider you want to embed.
PHP code
This one is really only useful to developers. Smart Slider allows you to call a slideshow in a template file, by using the PHP code located on the right. If this seems like a good fit for what you are trying to accomplish, you will have to contact your Sandhills Designer to use this option as you cannot log into the server to get at the PHP files. However, once the slider is added to the template, you will be able to maintain it through this dashboard.
slider Output and management functions
You won't use these all that often, but it's good to know what these buttons do and when to use them.
Take a minute to mouse over the different icons in the upper right white area opposite the slider name. there is some good stuff here.

- Quick Edit is an easy way to change the target URLs of your slides. You can also change the title and meta description in this window.
- Clear Cache button (dustpan) is useful if the slider seems to have issues displaying images.
- One nice feature is the Export Slider as HTML feature. Click the button an you will get a zip file of everything you need to make a static version of your Smart Slider!
- You can also Export your slider (box w/ arrow out) and import it into another site.
- Copy Slider buttons (two boxes) is great for making multiple similar sliders for different sections of your site.
- The Delete Slider button does just that.