Backend Tools
While most of your time will be spent up front in the editor, there are a few tools you need to know how to use that only reside in the backend on the WordPress Dashboard. Many of them are cleverly hidden in the settings menu, but custom tools tend to be hidden in every level. Here's your guide to what is what.GENERAL SETTINGS
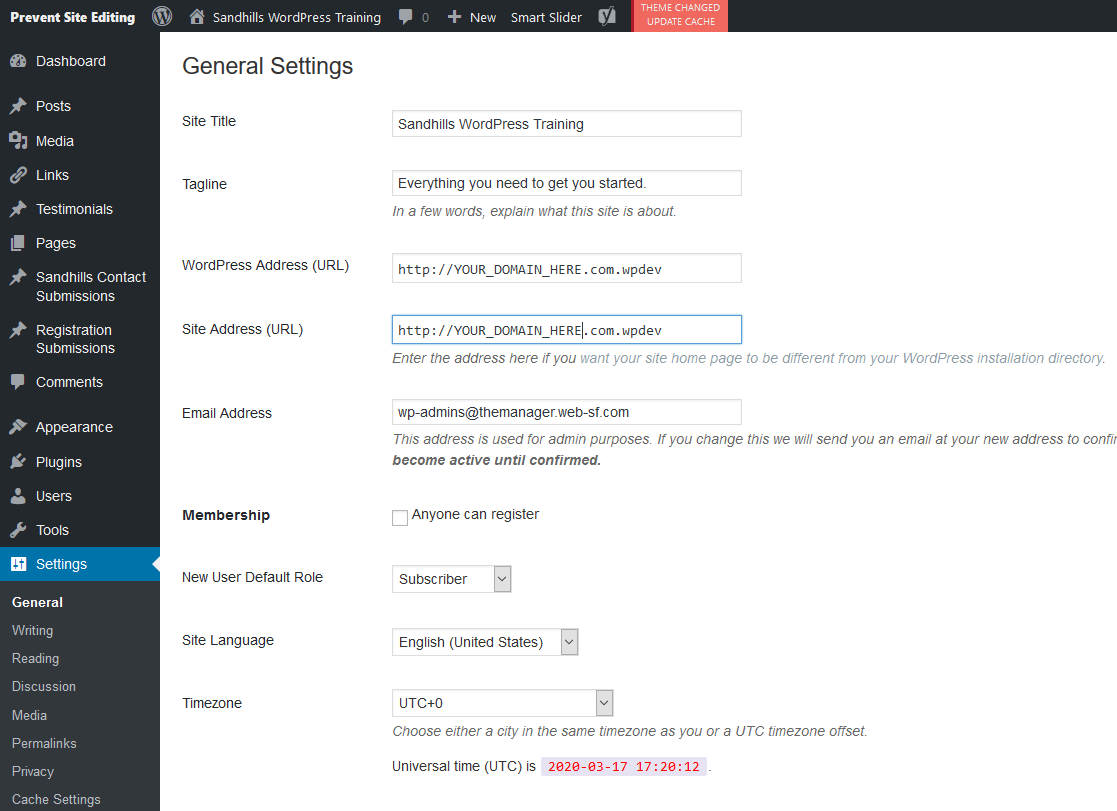
SITE TITLE / TAG LINE
WORDPRESS ADDRESS (URL) / SITE ADDRESS (URL)
These should almost always be the same. They will vary from environment to environment, but the Site Copy Process should change them for you as it moves the site from environment to environment. This is the format the settings should be in for each environment:- DEV: https://Your_Domain_Here.com.wpdev
- STG: https://Your_Domain_Here.com.wpstg
- LIVE: http://Your_Domain_Here.com.wplive
READING SETTINGS
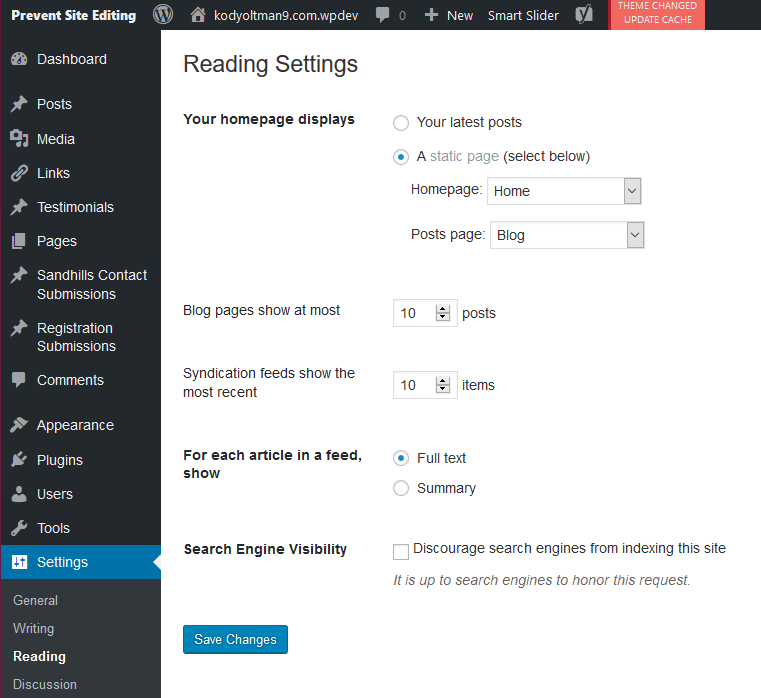
There's not much here. the big thing here is that you set the home page to be whatever page you want from the provided drop down menu of published pages. You can also choose which page displays your default blog posts.
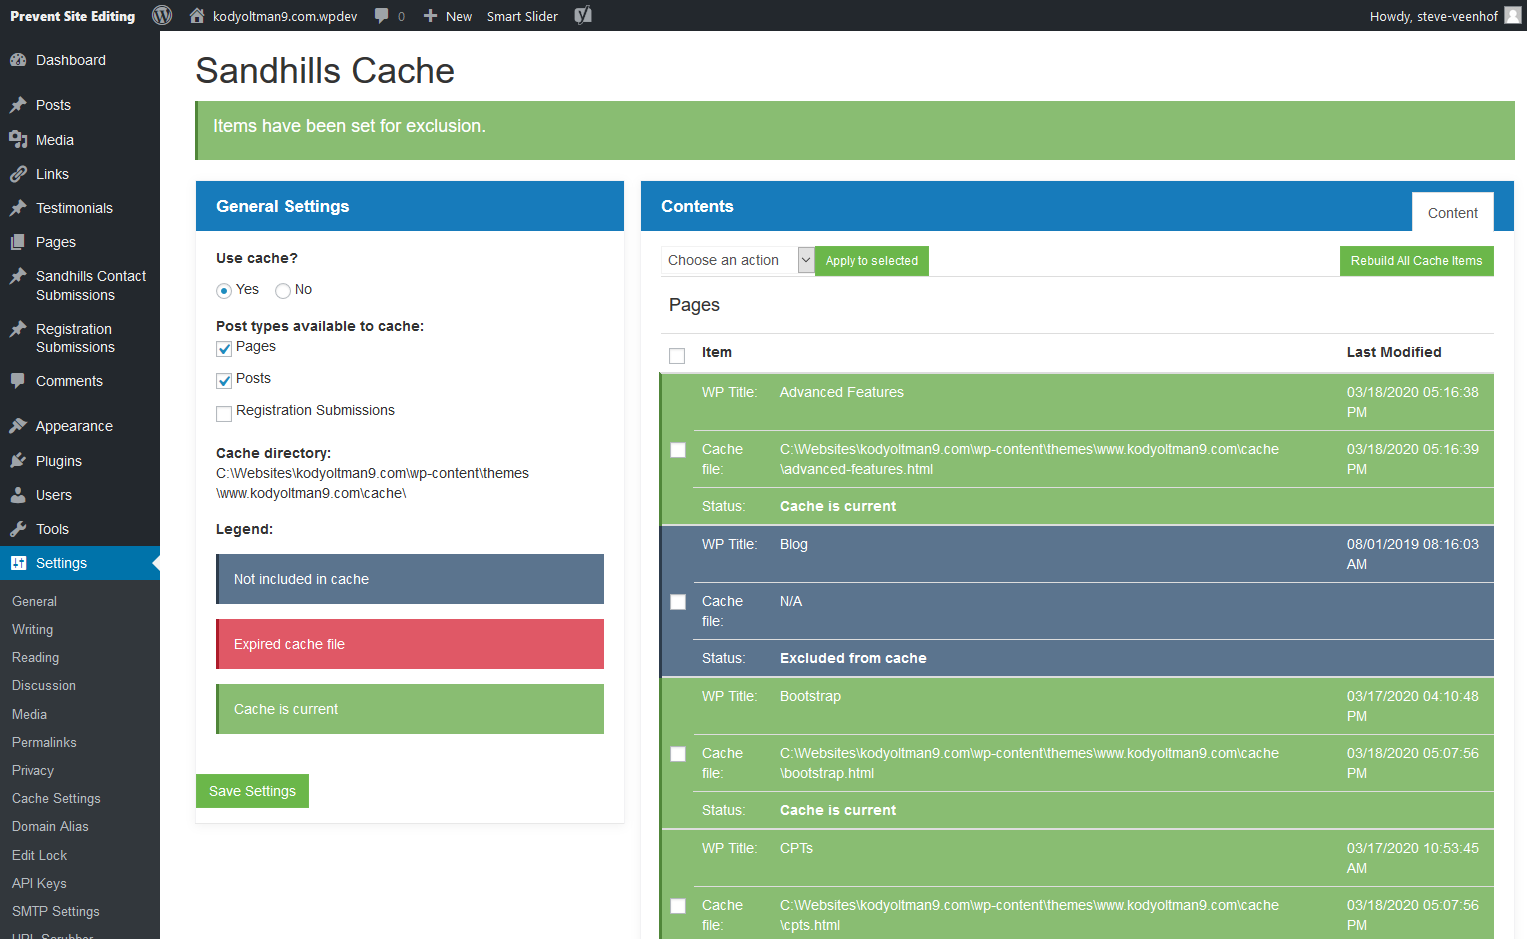
CACHE SETTINGS
WHY THE SANDHILLS CACHE?
Quick page loading times are not only great for users, they are also incredibly important for SEO rankings and server health. To that end, we have created a custom site caching system that will speed page loads and is specifically designed to work with our editor.HOW DOES THE SANDHILLS CACHE WORK?
The way the cache works is that it actually goes through and takes a snapshot of each page’s contents and saves them in a flat HTML file that loads and displays quickly in the customer’s browser. This eliminates a lot of scripts and database calls that can slow down page rendering. It basically takes your dynamic, easy to edit WordPress site and saves a flat HTML copy of each page that loads faster for customers.These flattened HTML files are located in a folder located in: themes > sitename.com > cache . This folder is created when you turn on the site caching and is deleted when you disable it.
If site cache is enabled, WordPress will automatically try to serve the requested pages from the cache folder. If it sees that the database (“live” page) has been updated more recently than the cached copy, it will serve the page from the database. This way, if you forget to rebuild the cache, users will still get the latest version of the content, even if it takes a few more seconds to load.
Inventory pages will never be cached because customer inventory is constantly changing. You don’t have to do anything special, we have set it up to recognize inventory links and automatically exclude them from the cache.
Editing a cached site is no different from normal. When you log in, WordPress will automatically serve your webpages from the database, not from the cache folder. When you save a page, it will also automatically rebuild the cache for that page if it is not manually excluded in the backend.
USING THE SANDHILLS CACHE SYSTEM
To get to the Sandhills Cache screen, log into the back end of WordPress and go to SETTINGS > CACHE SETTINGS .Site Caching is disabled by default . You will have to manually turn it on. This is a simple, 4 click process.
- Choose YES on “Use Cache?”
- Click the checkboxes next to the types of pages you would like to cache. Usually you will select both Pages & Posts. However, you can choose both or just one of them.
- Click “Save Settings” to apply changes.
Once the page reloads, you will see the list of all available pages for caching. All of the pages will be red because no cache of these pages exist yet. Red items mean the page is out of date compared to the database content.
The easiest way to initially cache all the pages is to click the REBUILD ALL CACHE ITEMS button in the top right corner.
You will see the screen change and the caching system will render each page individually and save it to the cache folder. You will see a preview of each page and also see each URL on the left change from red to green as the cache is built. Once it is complete, the page will reload back on the Sandhills Cache page.
When the page reloads, all of the red pages should be green. Congratulations! You have just successfully enabled caching on the site!
WORKING WITH INDIVIDUAL PAGES.
There may be times when you don’t want to have a page cached. Maybe you are loading dynamic content from another source or have a custom form that could potentially act up when the site is cached. Whatever the case, each page can easily be excluded or included from the cache quickly and easily.There are 3 states a page can be in:
- Cache is Current (green)
This means the site has cached the most recent version of the page and it will be served to the public. - Expired Cache File (red)
This means the database has been updated more recently than the cache file. The cache file must be rebuilt. - Not included in cache (charcoal grey)
This means that this page is specifically excluded from caching and will never be served from the cache folder.
To manually manage a single page, just click the checkbox next to the page you want to manage, then choose the correct action from the dropdown above the listings and lick the APPLY TO SELECTED button. You can manually rebuild a single page’s cache, add a page to exclude list (turning it dark grey), or re-include an excluded page.
UPDATING THE CACHE AFTER A TEMPLATE CHANGE.
Whenever you make a change to the template, you will need to rebuild the cache. If the caching system sees that template theme files have been updated more recently than cached pages, it will ignore the cached folder and serve pages directly from the database. This means people will always get the latest content, but it also means the site will probably load noticeably slower.Just come into the Cache Settings page and click the REBUILD ALL CACHE ITEMS button to remake the cache. To help you remember, we have added a notice in the edit bar or WordPress. Click the notice to get to the Cache Settings page.
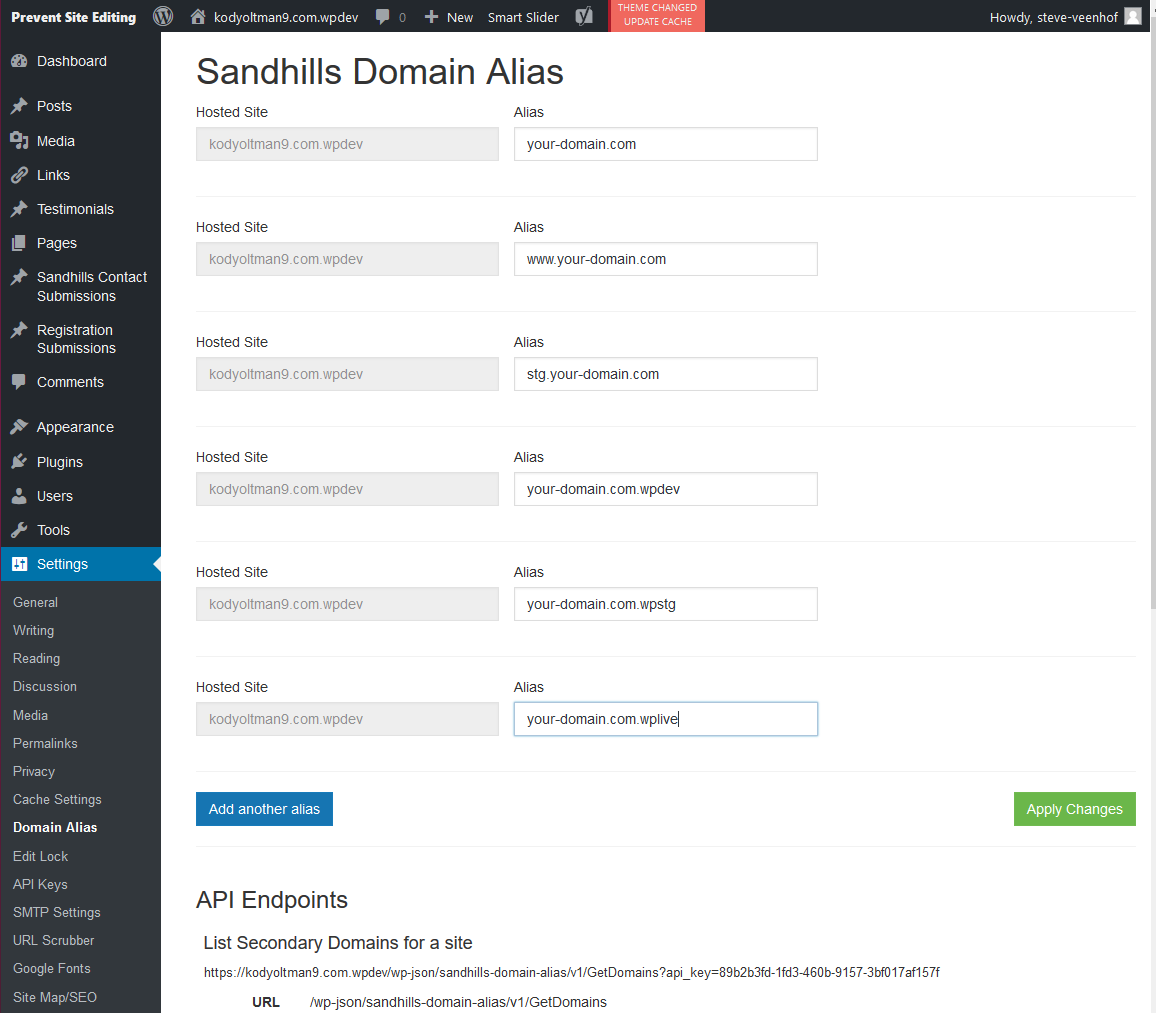
DOMAIN ALIAS SETTINGS - IMPORTANT!!!!!!!!!!!!!!
The Domain Alias is probably the most important setting in your site. You should be checking to make sure they are all entered correctly on every build.
What the Domain Alias does is to allow any URL that is set up in this list to be served as the primary URL for this website. Irregardless of what is set up in WordPress.
YOU ABSOLUTELY MUST MAKE SURE THAT ALL NECESSARY URLS ARE REGISTERED IN THE TOOL IF YOU WANT THE SITE TO WORK WHEN IT ROLLS LIVE .
These domains roll with the site from environment to environment, so set them all up right away and you shouldn't have to worry about it again. In theory, these will be set up when the site is created and updated automatically when the site is rolled forward or backward, but it's always a good idea to double check them before it becomes an issue and we have an upset client with a broken site. DOMAIN VARIATIONS
There are a few variations of the site you need to add so that the site resolves, no matter how a customer browses to it. These are more for a fail-safe, as all traffic should get routed to www.domain.com . However, sometimes things happen and it only takes a few seconds to set these up.
DOMAIN VARIATIONS TO SET UP ON EVERY SITE
- primarydomai n.com
- www. primarydomain.com
- stg. primarydomai n.com
- primarydomain.com .wpdev
- primarydomain.com .wpstg
- primarydomain.com .wplive
- secondarydomai n .com ( as needed )
- www. secondarydomai n .com ( as needed )
This tool is super simple to use.
HOSTED SITE FIELD
This shows what is currently set as the WordPress Address (URL) from the GENERAL SETTINGS page. It is irrelevant to the domain Alias, other than the fact that you don't have to have an alias of the WordPress Address. However, it's a good idea to have every possible version of the URL set up as they change from environment to environment.
ALIAS FIELD
This is what sets up the actual aliases. Just add the domains you need to resolve to the ALIAS box.ADD ANOTHER ALIAS BUTTON
Just keep clicking the ADD ANOTHER ALIAS button and you will be able to add as many aliases as you need.
APPLY CHANGES BUTTON
When you are done, click the green APPLY CHANGES button. That's it!
API ENDPOINTS
These are for reference only and can be completely ignored. They don't even really need to be on this page. URL SCRUBBER SETTINGS
The URL Scrubber is the second most important setting in your site. We mentioned above in the domain aliases how important they are in allowing us to serve web pages from different URLs. I believe we've also mentioned that each environment in Sandhills runs on a different URL (.wpdev, .wpstg, .wplive). The URL scrubber goes in and takes any saved link in the database or files and makes them relative. This means it removes all the domains and variations there of from any link it finds. It will even clean the domain name out of text content. This is the tool that makes our development environments and the way we build websites possible.
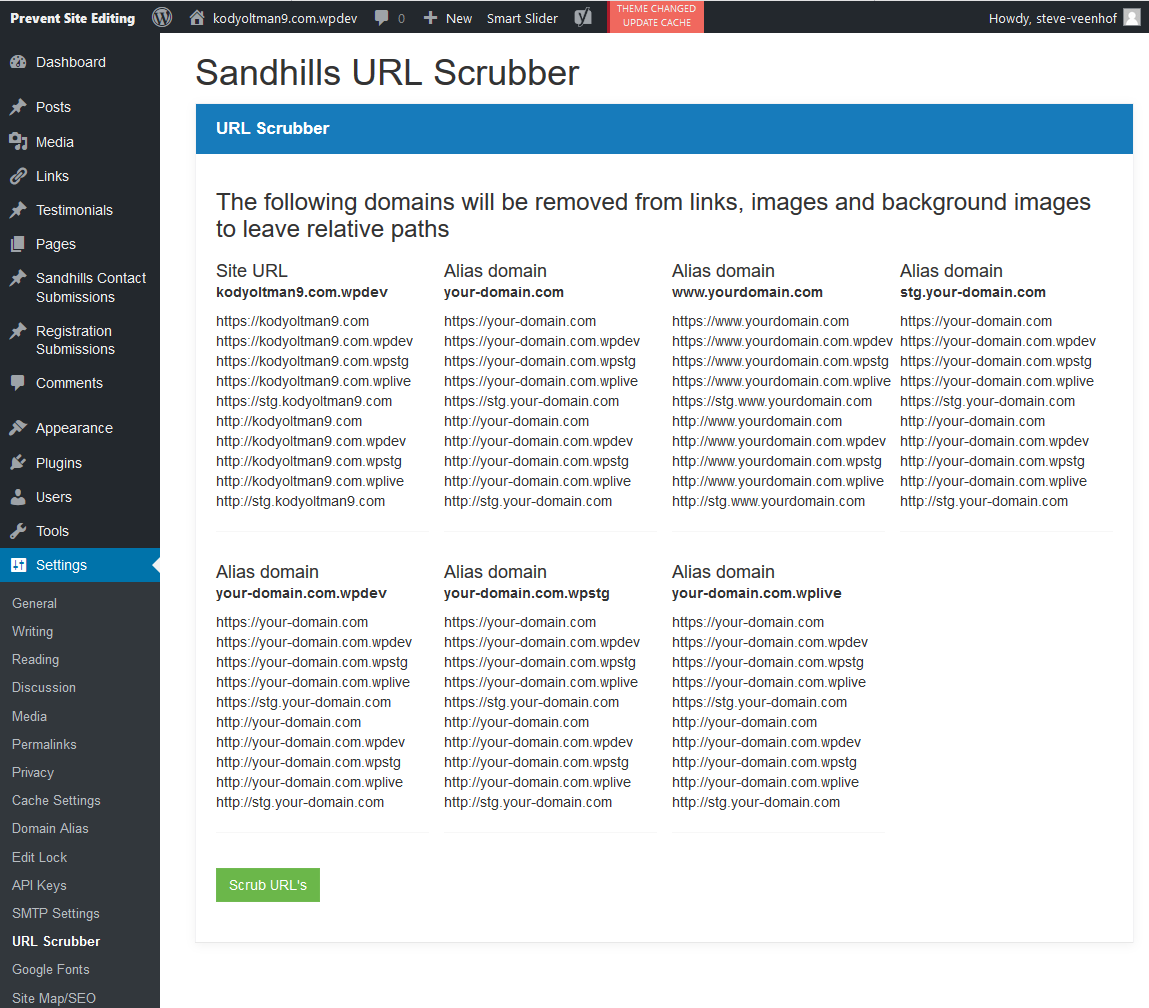
The URL Scrubber should be run automatically on Site Copy, so it is unlikely you will need to use it much. Make sure the correct Domain Aliases are set up from the displayed list and click the SCRUB URL'S button. That's it!
WHEN TO USE THE URL SCRUBBER
You would most often use this if you see a lot of missing images or content after a site copy. It solves most problems you generally encounter after a site copy. It should be the first bit of troubleshooting you try if you see any issues after a site copy. It should also be run any time a Domain Alias is added or updated.The URL Scrubber will not break your site and won't harm it if you run it when it is not needed. It's an easy thing to try and does fix a lot of seemingly serious issues.
WHEN IN DOUBT, RUN THE URL SCRUBBER!
Max Image Size
This is a simple setting to make sure the customer doesn't upload 13 Megapixel images that ruin page load times.
We just set a max width on all images that are uploaded to the media gallery.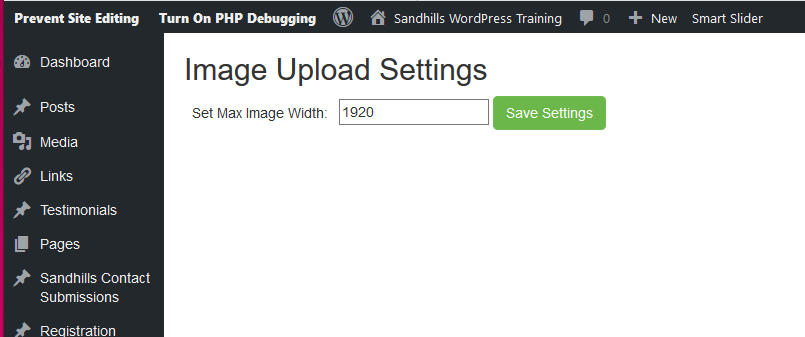
If the uploaded image exceeds the set width, we use the image resizing features in WordPress to shrink the image to the max size proportionally before it is saved into the uploads folder. This means the original full-resolution image is never saved to the server.
The default setting is 1920px wide.
1920px is full HD resolution and the resolution of most good monitors today. This is obviously a little large, but is the safest setting for a default. If you have a max width on the site, please adjust accordingly.
We ignore height, so they can still upload a large portrait image, but something is better than nothing.
This works on images uploaded through the MEDIA page, The Folder View, or the front of the Editor.
This feature is not designed to edit images or format slideshows, just help customers keep file sizes down to a reasonably large number.
SITE MAP/SEO SETTINGS
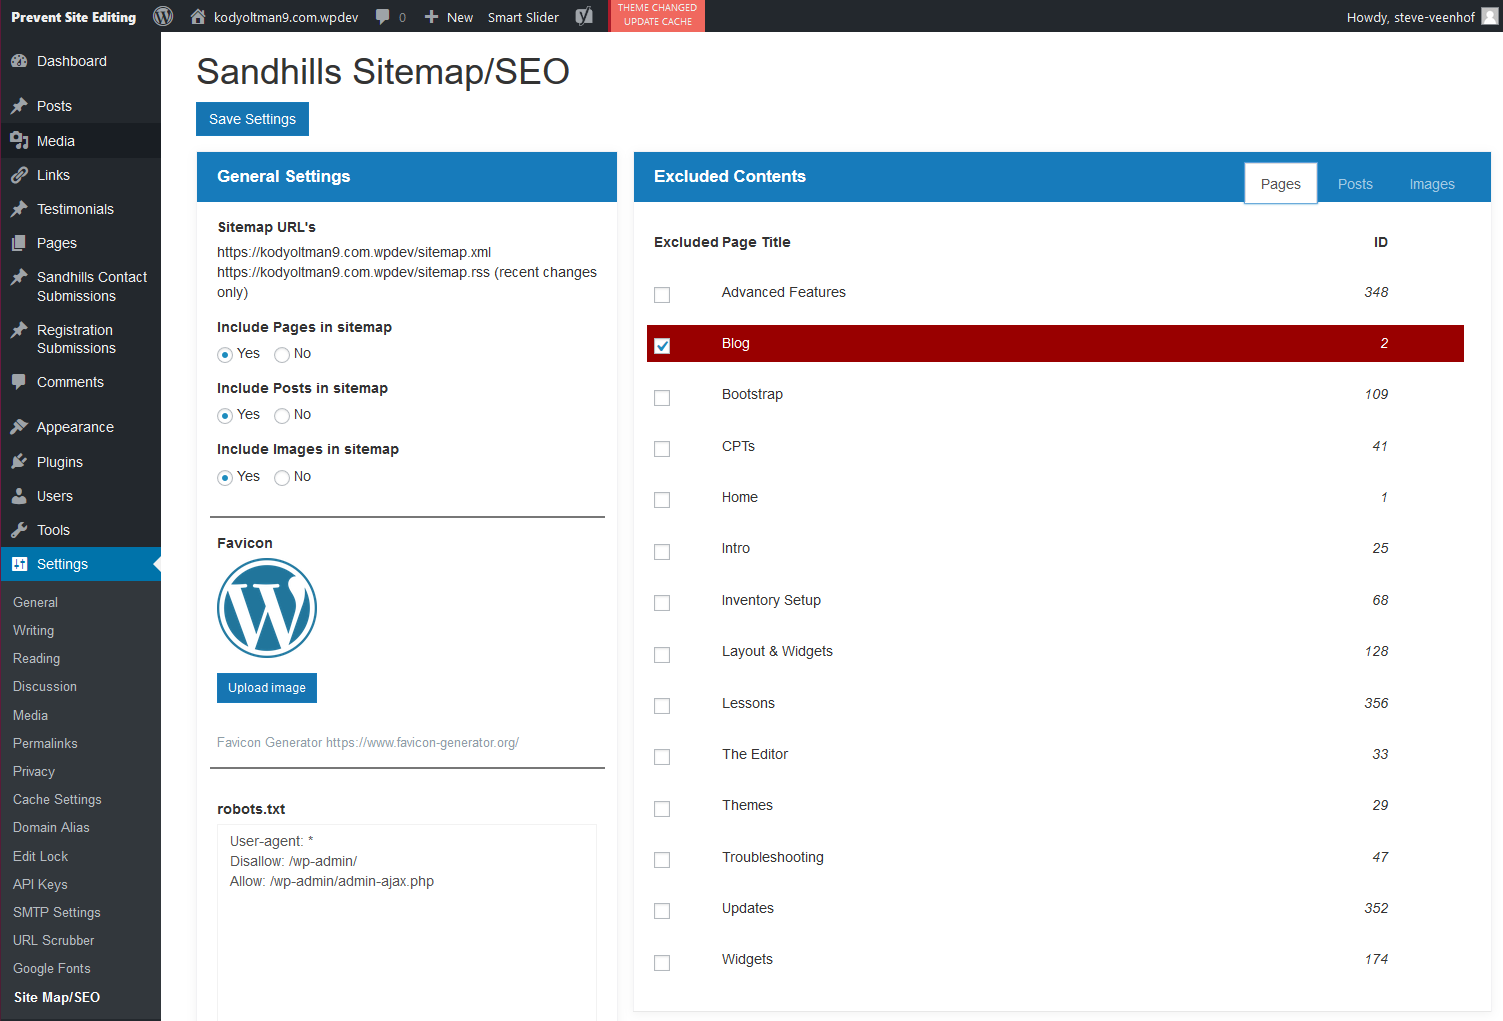
GENERAL SETTINGS
The sitemap tool will create a feed of Pages, Posts, and Images. You can tell the tool to exclude one or more of these categories by changing the setting to NO in the left pane.EXCLUDED CONTENT
In the right pane, you have 3 tabs. Each corresponds to Page, Posts, or Images. There is a list of every item that the sitemap tool can find in these categories in their respective tabs. You can exclude specific items from being indexed in the sitemap by clicking the checkbox next to them.FAVICON
You can choose your favicon on this screen as well! Just click the UPLOAD IMAGE button and you can either choose an existing image from the media gallery or upload a new one. Squarish images tend to work best.ROBOTS.TXT
This allows you to easily edit the robots.txt file on your site. This is what sets up the rules for bots that crawl your site, including Google.CONFLICT WITH YOAST
Yoast is installed on every site, but it also generates a sitemap. You will often find that the Yoast sitemap has about 3-6 pages on a site that should have dozens. YOU MUST DISABLE THE SITEMAP IN YOAST so that ours is served.
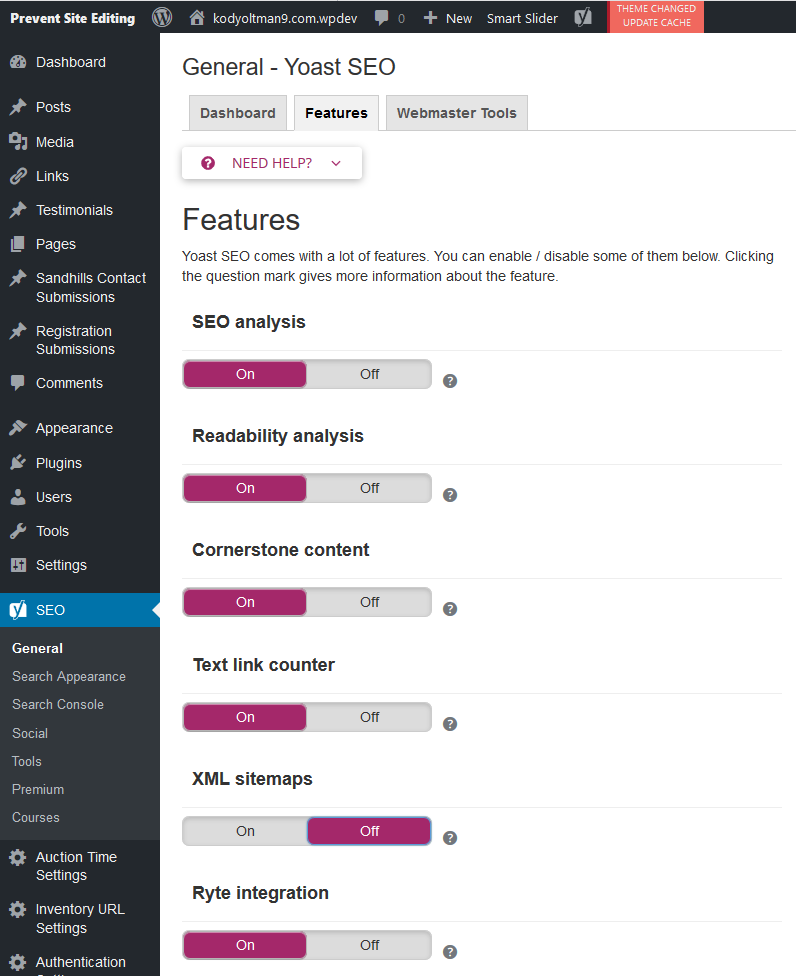
It's a real easy process.
- Jus t click on SEO in the bottom of the left admin menu
- G o to the middle FEATURES tab
- scroll down and turn off the XML sitemaps .
- Click SAVE .
Now you will see a HUGE sitemap.xml file. (Unless your site is tiny, but it should still be bigger.)
To access the Meta Dashboard page, click the METADATA link toward the bottom of the black sidebar in the dashboard.
If you do not have a METADATA link, you may have to activate the SANDHILLS PAGE METADATA plugin on the PLUGINS page.
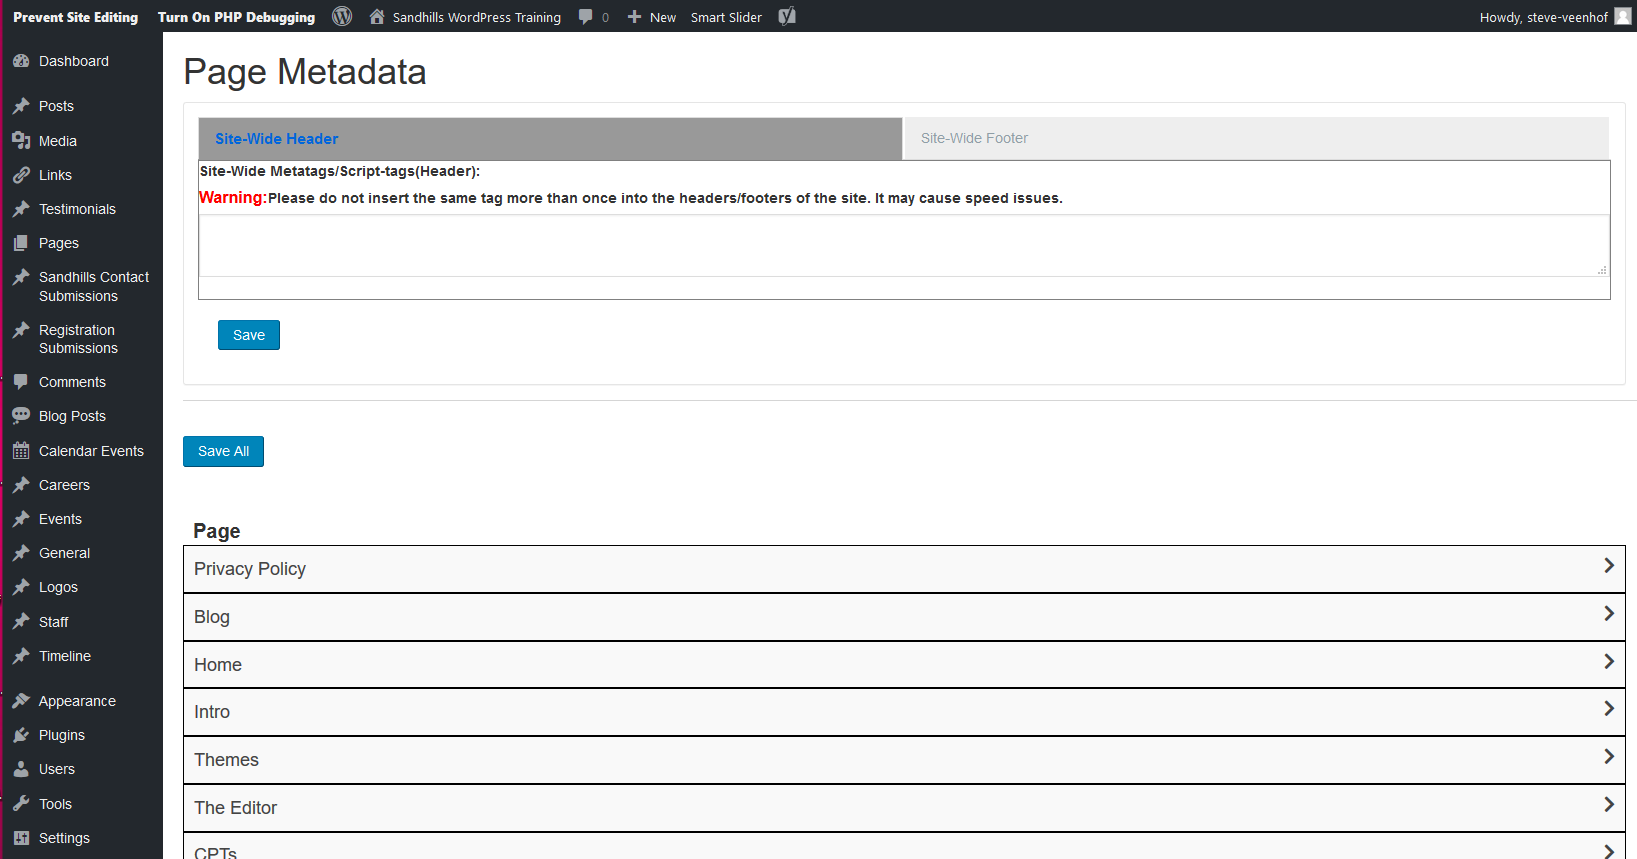
The metadata page has two main sections. The top area allows you can insert scripts and code into the header or footer for the whole site (like for analytics or tracking codes). The bottom sections is a breakout of all the pages and CPT listings that will give you access to the individual page metadata.
Updates to Header / Footer metadata
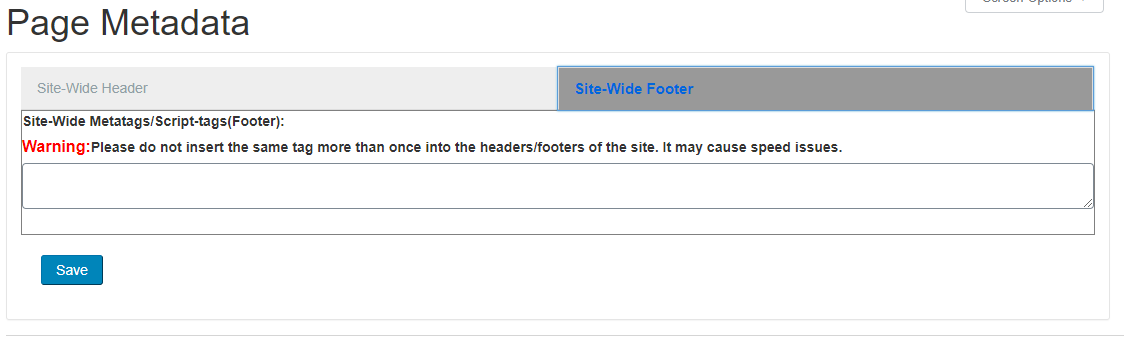
This top section is exactly what it seems. Just paste in any tracking codes or any scripts that need to be loaded in the header or footer. To toggle between the two, just click the two buttons above the box.
Updating Page Metadata
To update individual page metadata, just navigate to the page you want to edit and open the accordion for that page by clicking on the page name.
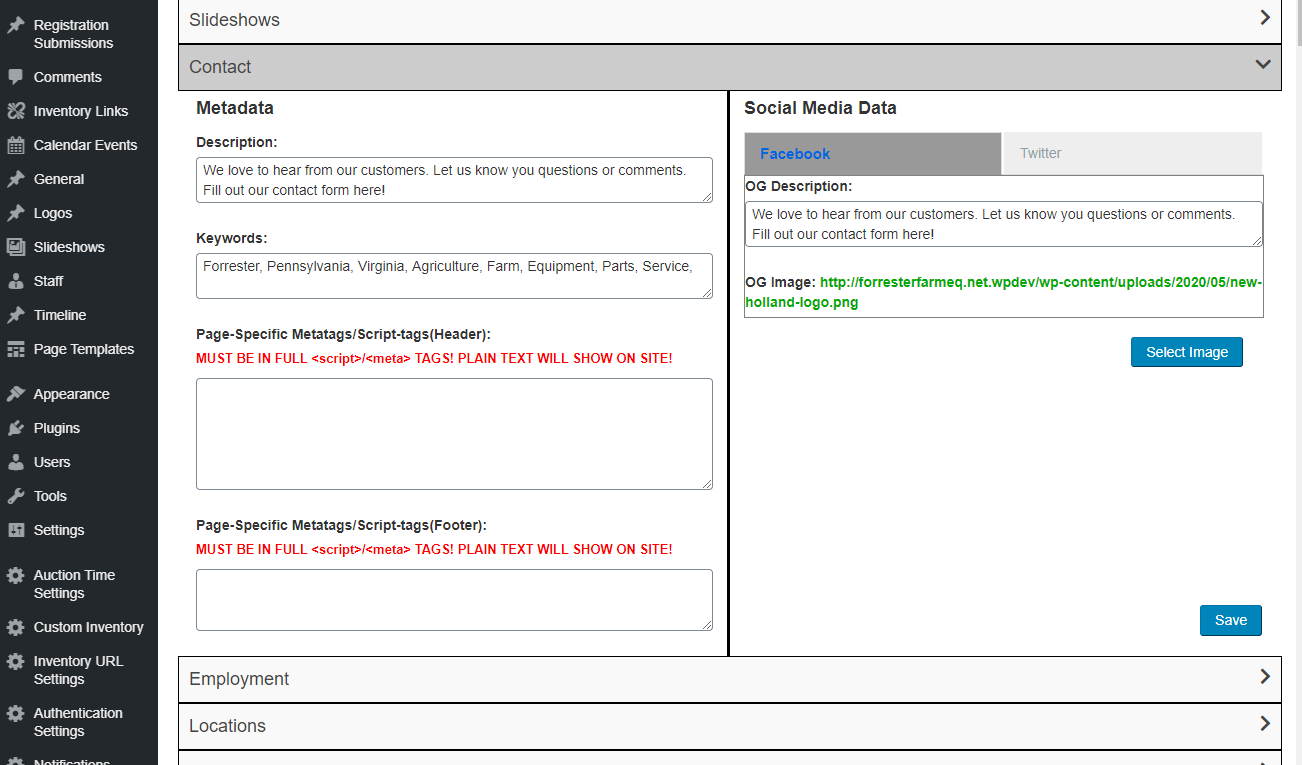
You will see all the settings you are familiar with.
Metadata
- Description
Edits meta description field. Same as in META tab of editor. - Keywords
Normal meta keywords. Same as in META tab of editor. - Page-Specific Metatags/Script Tags (Header)
This adds specific metadata or scripts to a single page below the site header metadata. This is ideal for customers creating landing pages for AdWords or other tracking scripts that they want to track visits or conversions for a single page.
Any loose text entered in this box will display on the front of the site above your template! Be sure you are entering data inside meta or script tags like you would normally see in a site header. - Page-Specific Metatags/Script Tags (Footer)
Same as above, but in the footer. This adds specific metadata or scripts to a single page below the site footer metadata.
Any loose text entered in this box will display on the front of the site! Be sure you are entering data inside meta or script tags like you would normally see in a site footer.
Social Media Data
Once again, this is just like the META tab in the editor. It is broken out to Facebook and Twitter specific metadata.- OG Description (Facebook)
Meta description specifically for Facebook. - OG Image (Facebook)
Browse and select an image that will be the default image Facebook pulls for that page. - Twitter Site
The URL for the twitter account - Twitter Creator
Submits Twitter creator data - Twitter Description
Meta description specifically for Twitter. - Twitter Image
Browse and select an image that will be the default image Twitter pulls for that page.
What this tool does is allow you to control which pieces of style and javascript load in the header and which ones load in the footer. We have done this by breaking apart Bootstrap's style sheet into it's component parts, allowing some to load in the header and some in the footer. We have also done the same with jQuery as it often slows down page load times.
This tool allows you to customize your site to find the optimum balance between page speed and page snap.
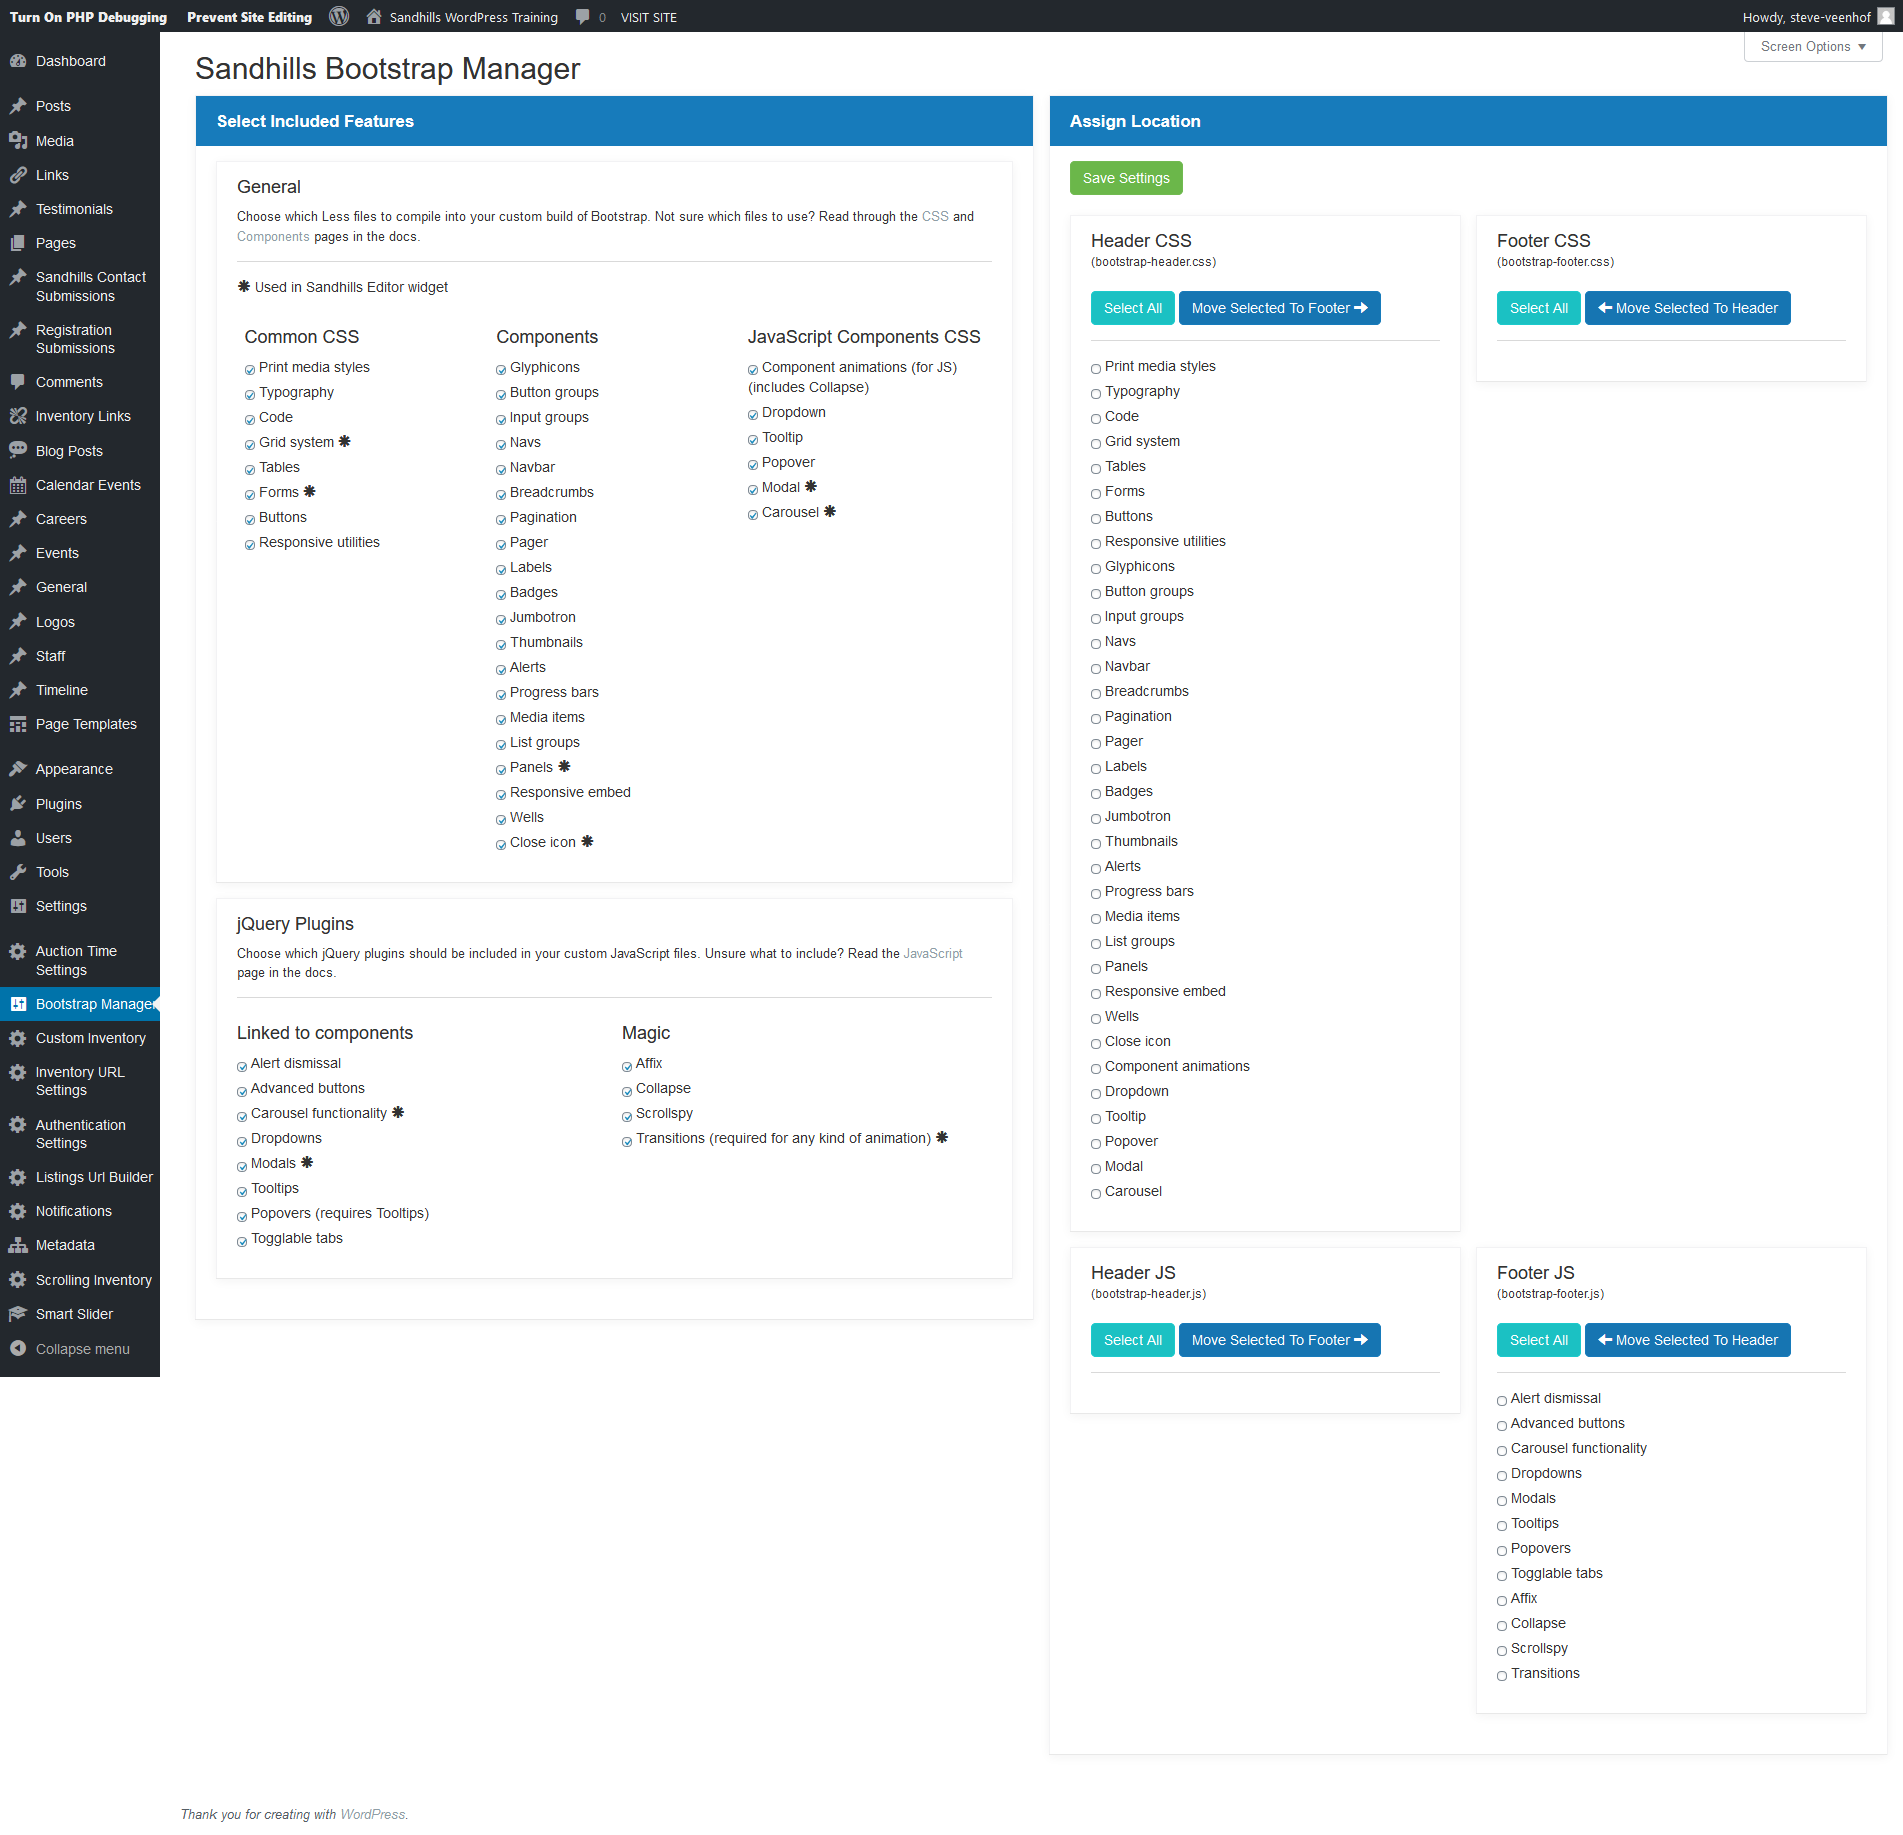
Once you are happy with where things load, click save. Now go refresh the site on the front end and make sure it behaves the way you want it to. Make additional changes as necessary and repeat the process.
Note:
- If you do not see this in your admin menu, you may have to activate the BOOTSTAP MANAGER plugin on the PLUGINS page.
- When you are changing the order of operation of where items load, it will change where your CSS loads in the relation to other default style rules in the website. Please be aware of this and make sure none of your styles are getting overwritten as you change the order the code is loaded in.
Notification Center
- You can schedule the date and time your notifications would begin and end. (Perfect for auctions!)
- Once dismissed, they will not show up again in the same browser session.
- They do have a simple editor making it easy enough for customers to use.
- The outputs are heavily classed, making them easy to preformat for customers.
- You can add as many notifications as you like and as many kinds of notifications as you like. They just stack like notifications on your phone.
There are three kinds of notifications: Top Bars, Bottom Bars and Pop-Ups.
Bar Notifications
Bars will show up either above your site or below your site and display a message. They do not block content as they load above or below the body of the site.These are usually just text, but you can add as much or as little content to them as you wish using the basic editor built in. As mentioned, they are easily styled using the classes built into the output.
Pop-Up Notifications
This creates a pop-up modal on the site that must be dismissed in order to proceed to the main content.Once again, you can add as much content as you would like using the built-in editor, including photos, embedded maps and video, or anything else you can dream up! HTML editing is an option as well using the TEXT tab.
Adding a Notification to your site
Scroll down near the bottom of the left-hand admin menu and click NOTIFICATIONS.If you do not have a NOTIFICATIONS link, you may have to activate the SANDHILLS NOTIFICATION CENTER plugin on the PLUGINS page.
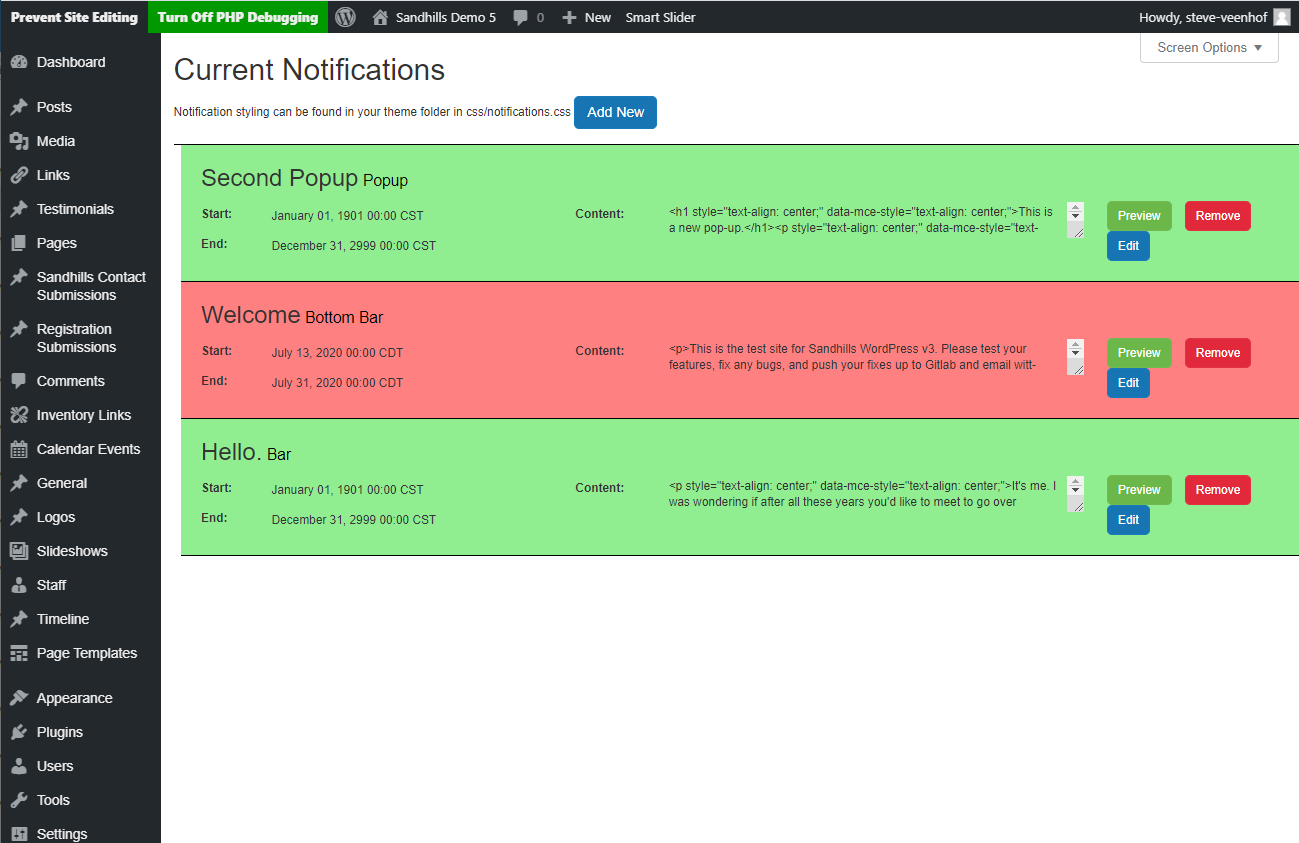
You will arrive at the notifications dashboard. Here you can see which notifications are active and which are outside of their date range. You can Preview, Edit, or Remove these notifications on this screen.
If you have no notifications, this will be a virtually blank page. To add a new notification, click the blue ADD NEW button up above the dashboard. Fittingly, this will launch a pop-up window that will allow you to create your new notification.
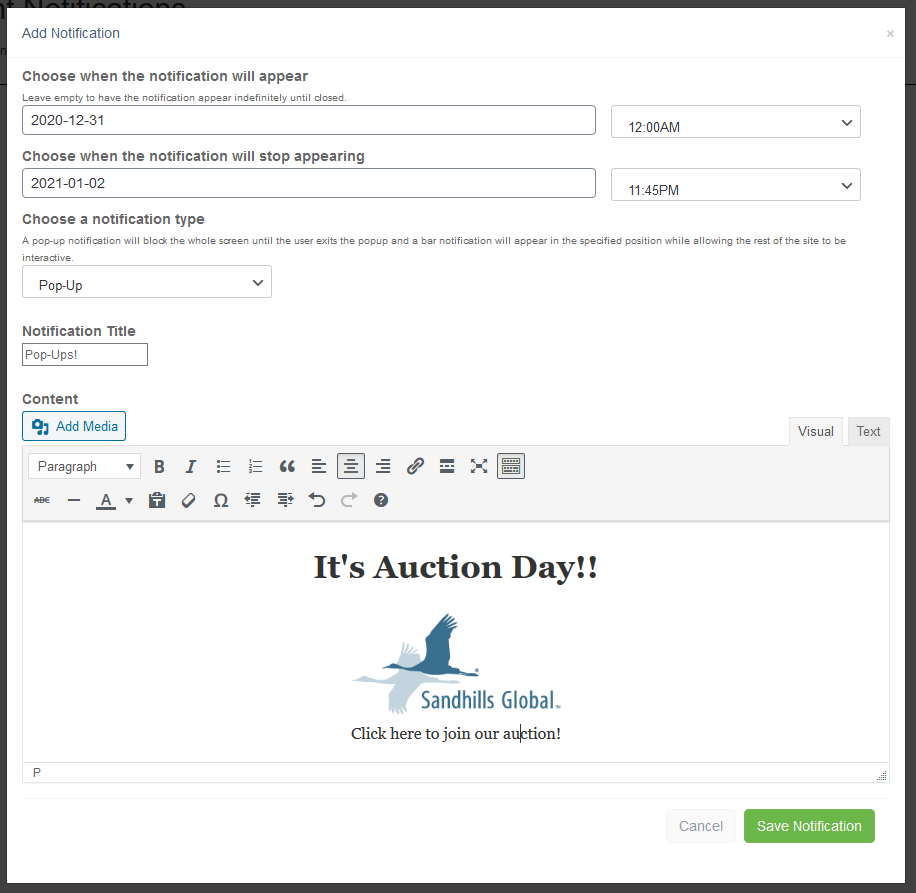
- Choose when the notification will appear (optional)
When you click into the first field, a calendar will appear. Choose the date you would like to start showing your notification. The second box is a select box of times. They go in 15 minute increments. If this field is left blank, the notification will appear immediately - Choose when the notification will stop appearing (optional)
When you click into the first field, a calendar will appear. Choose the date you would like your notification to stop. The second box is a select box of times, which go in 15 minute increments. If this field is left blank, the notification will go on indefinitely (or until deleted). - Choose a notification type
This is where you select if you want a bar above the site, below the site, or a pop-up window over the site. - Notification Title
This is used in the notification dashboard, but also shows up at the top of your notification. You can hide it or style it with CSS as you would like. - Content
This is where the bulk of your work is done. Add as much or as little content as you like, depending on your needs. You can add photos with the ADD MEDIA button. Don't forget you can get access to more tools by clicking the Toolbar Toggle button (as illustrated above). For more advanced notifications, use the TEXT tab to write your own custom HTML.
Styling Notifications
We have built a separate stylesheet that is easy to edit and located right in your theme folder to ensure it rolls with your site during site copy.You can access the style sheet at \wp-content\themes\www.yoursite.com\css\notifications.css
The styles are simple and easy to understand. Modify them as you see fit.
The scrolling inventory is actually added by a widget, but before we get there we have to create the settings from the Dashboard.
Scroll down near the bottom of the left-hand admin menu and click SCROLLING INVENTORY.
If you do not have a SCROLLING INVENTORY link, you may have to activate the SANDHILLS SCROLLING INVENTORY plugin on the PLUGINS page.
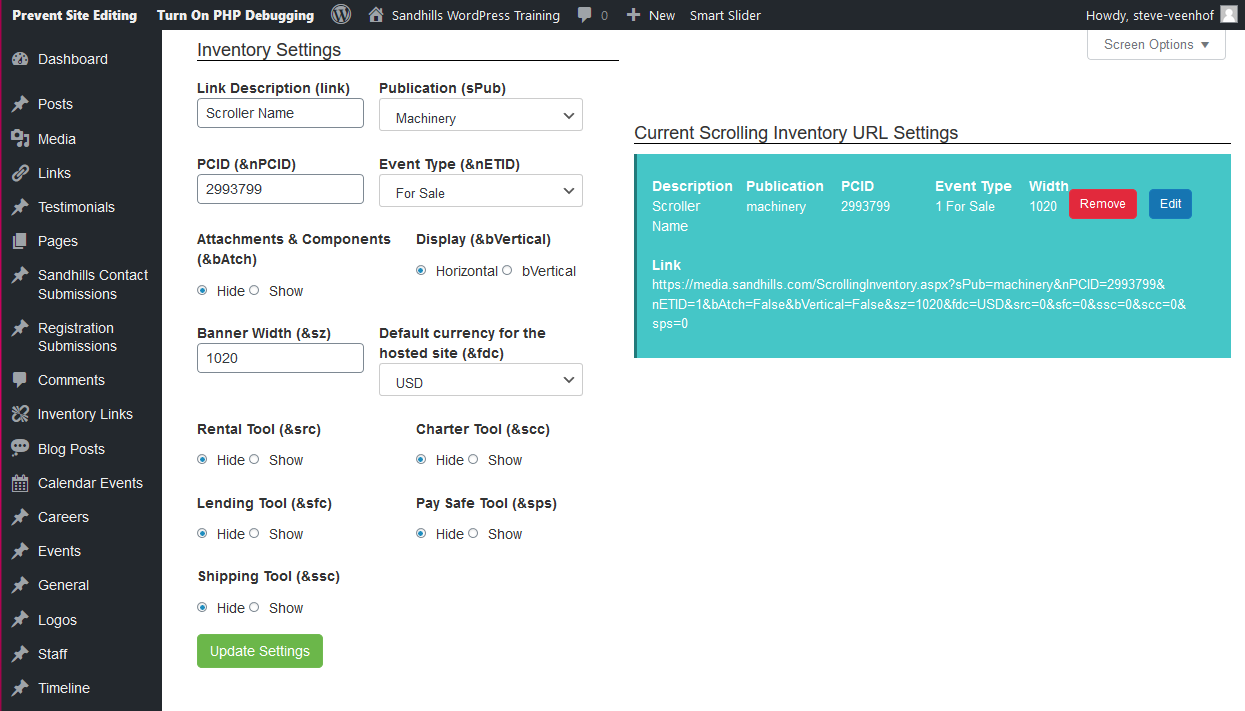
These settings are pretty straight-forward:
- Give your scrolling inventory a name (Link Description)
- Choose the Pub you will be drawing inventory from
- Enter the PCID
- Choose whether you want for sale or for rent equipment
- Give it a width
- Save the settings!
Now you can add the Inventory to your page from the Scrolling Inventory Widget!
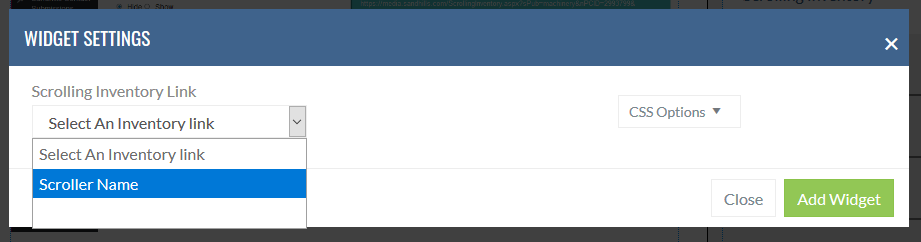
It's super easy to add the scroller to your page.
- Add a Widget like normal
- Navigate to the OTHER tab and click the SCROLLING INVENTORY button
- Choose which scroller you want on this page from the drop-down menu
- Click ADD WIDGET
The scrolling inventory will show up after you save the page.
sdfsgfdsgsdf dflkjgsd;flgdf